This week the Practical Scrappers challenge is to use eyelets. Be sure to stop by there to see all the amazing ideas from both design teams on what you can do with eyelets. Here were my submissions :
 Supplies : Paper - Basic Grey (Urban Prairie) and Scenic Route; Thickers Letter Stickers by American Crafts; Flowers by Prima; Buttons by Papertrey Ink; Eyelets by Making Memories; Ribbon - Blue by American Crafts, Black unknown (RAK); Cardstock by CTMH; Embroidery Floss; Nestibilities
 Supplies : Paper - Pebbles (Background), Scenic Route, My Minds Eye, Sassyfras (Button Blooms); Eyelets by Doodlebug; Buttons by Papertrey Ink; Urban Bling Stickers by Me and My Big Ideas; Embroidery floss; Nestibilities
 Supplies : Paper - Basic Grey Porcelian, My Minds Eye, Cosmo Cricket, and Making Memories; Ribbon from CTMH and My Minds Eye; Eyelets from Making Memories; Thickers by American Crafts; Embroidery Floss;
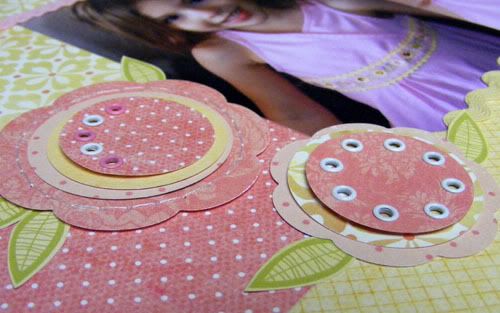
Supplies : Paper - Basic Grey (Urban Prairie) and Scenic Route; Thickers Letter Stickers by American Crafts; Flowers by Prima; Buttons by Papertrey Ink; Eyelets by Making Memories; Ribbon - Blue by American Crafts, Black unknown (RAK); Cardstock by CTMH; Embroidery Floss; NestibilitiesHere I started by using eyelets to create subtle circles around some of the more sour faces Caitlyn was pulling for emphasis on my layout. Make hearts, circles, stars, squares, any shape that you like! The closer the eyelets are the bigger the shape's impact, the further apart the more subtle. To create this look use a punched out shape or open die like the Nestibilities. Using your paper piercer to mark the eyelet spots, poke evenly spaced holes around the edge of the shape making sure to leave enough space for the eyelets. Using the classic hammer with punch or a Big Bite, punch the eyelet holes right over your pierced hole markers. Add your eyelets and back the open eyelet hole area with coordinating cardstock. Here I used white to back my silver eyelets.
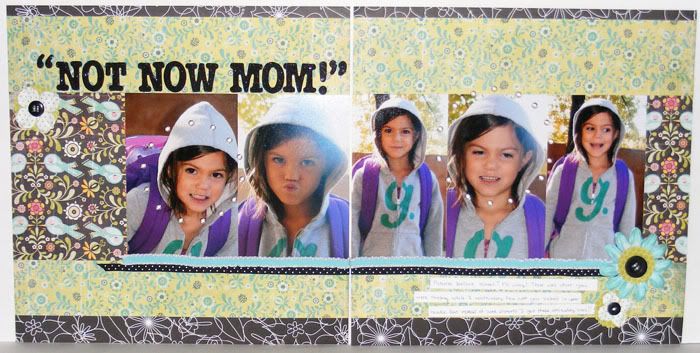
Supplies : Paper - Pebbles (Background), Scenic Route, My Minds Eye, Sassyfras (Button Blooms); Eyelets by Doodlebug; Buttons by Papertrey Ink; Urban Bling Stickers by Me and My Big Ideas; Embroidery floss; NestibilitiesTry creating a fun border with your eyelets. In my layout I created a fun simple border using pink eyelets, then added eyelets to a couple of the journaling strips to make the look more cohesive. Do a varigated strip by alternating eyelet colors or emphasize details on a printed or stamped border by adding eyelets to the flower centers, in the scallop hump, etc. You could even use the same technique as I did on the Not Now Mom layout by substituting a scallop or other shaped border as a template for your eyelet placement to create a shaped eyelet border. Don't want too many eyelets? Simply use them to accent a couple journaling strips.
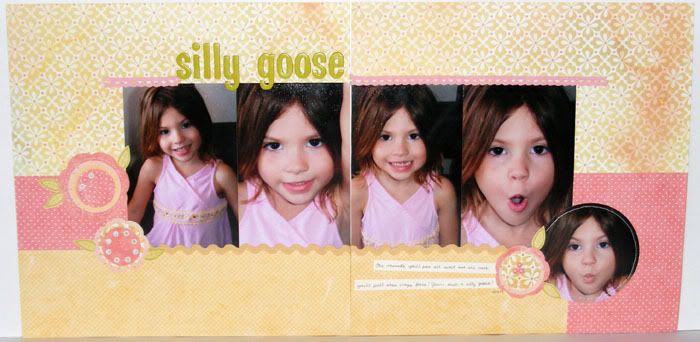
Supplies : Paper - Basic Grey Porcelian, My Minds Eye, Cosmo Cricket, and Making Memories; Ribbon from CTMH and My Minds Eye; Eyelets from Making Memories; Thickers by American Crafts; Embroidery Floss;Add accents to your embellishments with your eyelets. Here I created some blooms with my Nestibilities and then added some white and pink eyelets to accent the flower's centers. Accent stars, hearts, paper flowers, etc with eyelets for fun pop! I created my flowers and added the eyelets before adhering them to the layout so that I wouldn't have to back the layout with coordinating cardstock. Some leaves cut out from printed Cosmo Cricket paper finish off the blooms just right. This method also works great with those shaped eyelets. Add star eyelets to circles, heart eyelets to flowers, etc. I was actually cropping with a friend when I made these and she was so sweet to let me have some of her eyelets since all I have are the basics - silver, white, black, and brown! So if you're reading this, thanks Julie! I hope you all enjoyed the layouts and have a great Monday!
6 comments:
Oh wow! Three beautiful layouts. I love the eyelets on your flowers. Gorgeous!!
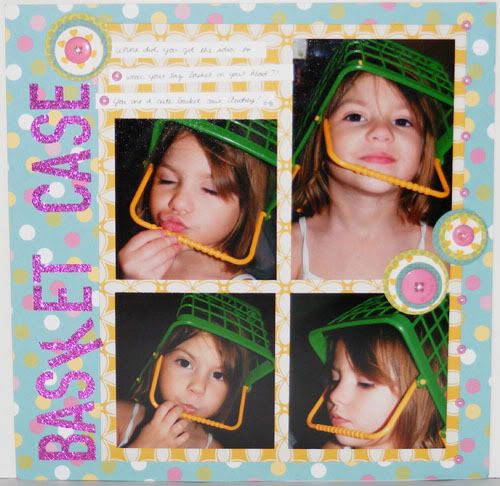
Great layouts Marjorie. I esepcially like the second one's title--Basket Case. d
Totally fabulous stuff! Way to use those eyelets!
What lovely layouts! I love all the eyelets!
Those are all wonderful layouts!!!! Love that title "basket case" hee hee:-)
3 gorgeous layouts! WOW!
Post a Comment