12.30.2009

Baby Before the New Year


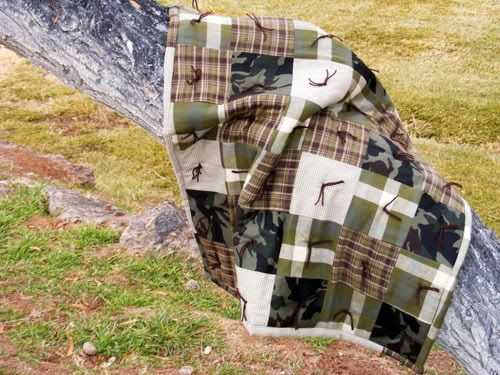
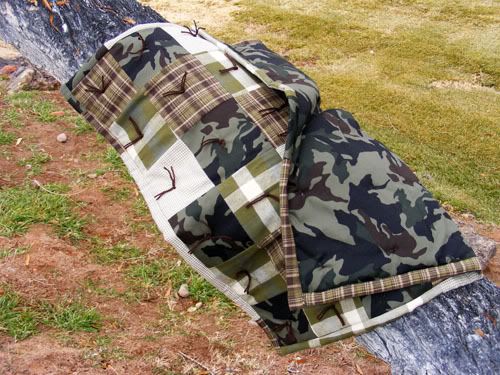
We've have a new addition to our extended family! Our little nephew was born yesterday morning ;) He's a premie at 4 weeks early but he was a good 5 lbs and 11 oz and they didn't need to put him in the ICU so we're really happy. Yesterday I went fabric shopping since I realized I don't have any boyish fabric. They want everything done in classic camo or with that type of theme so this is the quilt I made for them. It's a simple tied baby quilt with binding made from the scraps and even though the patterns aren't my style I think it turned out pretty cute ;D The white is actually a lighter beige plaid but the print is really tiny. I backed the quilt in the camo since that's the theme and I think I was lucky in finding a 100% cotton version since most all the rest of the camo fabric at the Joann's was that really rough stuff. I finished the quilt this morning and snapped some quick pics of it before they get it Saturday at the shower. Anyway, just thought I'd share. Have a happy hump day and thanks for stopping by!

12.29.2009

Snowy Cupcake Inspiration

Supplies : Rustic Snow, Signature Christmas, and Winter Swirls stamp sets by Papertrey Ink; Cardstock by Bazzil; Grid Paper by Scenic Route; Shimmer Cardstock from LSS; Rhinestones by Kaiser; White Embossing Powdery; Cocoa and White Daisy Ink by CTMH; Snowflake punch by Marvvy

Sparkle had such a yummilicious photo to use for inspiration for the Christmas Card Challenge this week! All I wanted to do was bake devils food cuppa cakes with cream cheese frosting after seeing it but I was a good girl and settled for some pumpkin swirl cheesecake. We have waaayyyyy too many goodies around the house from the holidays anyways. I feel like my new years resolution to get back in shape has already kicked the bucket and it isn't even 2010 yet, lol. Anyway, here's the card I came up with. I wanted to start making thank you cards for Christmas this year. While saying thank you works, I think it really makes such a difference to get a sweet note ;) Aren't these colors so gorgeous together! I wish I could catch that subtle shine on the white shimmer cardstock on camera, it is so pretty. I started out going for a cutesie card then before I knew it shimmer cardstock, white embossing and rhinestones entered the picture. I have to say though I really like this card better than the one I had in my mind. Things are slowly starting to settle down around here now. We had such a great holiday spending time with family and friends. I didn't get many pictures this year. Of course I'm also starting to believe that Christmas day produces the worst possible pictures because every year it seems all I get are badly lit, partial, blurred, or weird faces shots and not the cute weird faces either, lol. I might be staging a few shots before we take down the trees to attempt to get some nice ones to represent better the wonderful Christmas we had ;) Paul and I feel so blessed to have such amazing friends and family to make this Christmas extra special! And I'm so thankful to have such wonderful readers too! All of you have added so much cheer to my life year round! I hope everyone is having a fabulous holiday season. Thanks for visiting and I'll see you in the new year!

12.23.2009

On the First Day...

Supplies : Paper - Eskimo Kisses by Basic Grey; Cardstock by Bazzil; Sans Small Lowercase stamp set and Ink in Cranberry and White Daisy by CTMH; Rhinestones and Pearls by Kaiser; Borders and Corners Circles stamp set by Papertrey Ink; Mistletoe Slice card by Making Memories; Stickles;

I've finally escaped my kitchen after baking too many cookies to count these past couple days (and eating far too many too!) Let's just say last night I wasn't able to make dinner since the kitchen was in such disarray and we all ended up snarfing down cookies anyway because you have to taste test each batch right? To make sure they are good enough to give away yes? Paul ended up trying to eat all the Scotchies. Anyway that's my excuse for having cookies for dinner. The girls however did make away with Panda noodles as well as cookies so at least they had something more than just sugar to eat before going to bed, even if we didn't! It's the holidays, we're allowed ;D This is my card for Sparkle's #3 Christmas Card challenge. The added challenge was to use a sketch and I thought it would be so cute to do a 12 days of Christmas set! So here's the first one - my partridge in a pear tree cut with the Mistletoe card on the Slice. I added some stickles, pearls, and a rhinestone for his eye to pretty him up ;)

And thank you for the birthday wishes! I had a really fun day. Paul took me to see Avatar in 3D and we got to hang out around town a whole 6 hours without kids!! Yay for very patient and loving sis-in-laws ;D And I'm sorry I didn't get to this sooner! On the recipe yes it's cups for the shortening and molasses and yes you can use plain shortening. I just think it tastes better with the butter flavored which is usually right next to the regular at the store ;) On my reading, I'm starting the second book to a fantasy series I began some months back called Winds of the Forelands by David B Coe. If you're a fantasy fan the first book was an awesome read. So much happening and a lot of mystery and twists all intertwined with royal assassinations, magic, and a foreboding and unknown enemy. I'm excited to see what the assassin does, him and Grinsa are my favs. Anyhoo, thanks for stopping by. I hope everyone is having a wonderful and safe season. I won't have any posts til after Christmas so have a very Merry Christmas everyone!

12.19.2009

First of the Holiday Baking

Paul had his last final Thursday - Yay! We invited a friend over for an easy going hang-out-to-celebrate eve and it was about midnight that night when I realized I hadn't baked the cookies I was planning to for Caitlyn's teacher yet. Tomorrow (or rather later that day) was the last day of school before Winter Break and I knew I wouldn't be up early enough in the morning to do the baking before school. Paul and Mark were still up for entertainment so they popped in a funny mocumentary called the Mighty Wind (same guy that did Spinal Tap and Best in Show). Inbetween the laughs (I absolutely LOVED Eugene Levy's character, he was too hilarious!) I baked up some of our favorite holiday ginger cookies because they are so easy to make, because they are delish, and because Cait's teacher is just too awesome to not bake cookies for. So at one in the morning I was finishing up baking a batch of these babies and after the movie I wrapped them up cute ;D For her teacher I used the last of my repurposing ribbon and one of the new tags I made a couple days ago. A simple candy dresses the plain cello bag up to look more holidayish since I ran out of the snowflake ones. I also wrapped up a couple more mini cookie bags for a couple of neighbors, one for Caitlyn's friend that comes over all the time. They don't go to the same school and she's actually in fifth grade which I suppose means she could be babysitting for me, lol. This is the first of much Holiday Baking to come. Most of it is planned for Monday and Tuesday because today is my B-day and I'm spending it out and about with my hubby and then being completely lazy ;) Hopefully lazy with a book because I've really been wanting some time to settle down and read.


And I can't remember if I shared it last year, but in case you missed it or you just want to try them here is the recipe for these Ginger Cuties.


Softy Ginger Cookies

Ingredients:
3/4 C butter flavored shortening
1 C brown sugar
1 egg
1/4 C molasses
2 1/4 C flour
2 tsp baking soda
1 tsp ground ginger
1 tsp ground cinnamon
1/2 tsp cloves
1/4 C sugar in a small shallow bowl or dish

Directions: Cream together shortening, brown sugar, egg and molasses until well blended. Add in flour and spices. Mix until combined with spoon. Now it's time to get your hands dirty ;) Knead the cookie dough until everything is well blended. Roll dough into 1 1/2"- 2" balls then roll in sugar and place on an ungreased cookie sheet. Bake at 350 for 8-10 minutes, just until the cookies crack on the top. Cool on cookie sheet 10 minutes before removing. Enjoy and have a fantastic weekend!

12.18.2009

Tag Box + Tags

Supplies : Rustic Cream Cardstock; twine; 2008 Holiday Tags, Winter Swirls, and Borders and Corners Circle stamp sets by Papertrey Ink; Cranberry Button, Tulip Cardstock, Tulip and Ocean Ink by CTMH; 2" Scallop Circle Punch by EK Success; repurposed organdy ribbon; acetate

I don't know about anyone else, but I've been using tags like crazy this year! It's a good thing I've had so much fun making them ;) So I came across this tutorial for a tag box on Splitcoast and thought it would be perfect for all my tags, plus I would get to make more! I used one of my favorite color combos of red, blue, and cream; and my go to tag stamp set as well as the Winter Swirls which I hadn't really played with yet. On the back I stamped To and From and made a total of 40 tags with 10 quick and easy different designs. I made the box first, it came together a bit quicker than I thought it would, and then I worked on the tags. I punched out 2 sheets of 8 1/2" x 11 inch cardstock, you get 20 2" circles for each sheet. Then I stamped each design on 4 tags. You could make just 4 different tags or all one style tag. Wouldn't this make a cute gift too? To finish off the box I used more repurposed organdy ribbon. Caitlyn's class had done a fundraiser with a local baking mix company. One of the sets I ordered for us was actually a gift set so I've been using the ribbon for other stuff since I'm planning on making those particular goodies for us - pecan pie bars and apple crumb cake - yum! Below are the tags just for fun ;D Enjoy and have a fabulous Friday!

12.17.2009

Mini Paper Stockings


Supplies : Paper by Basic Grey; Buttons and Twine by Papertrey Ink; Thickers Letter Stickers by American Crafts; Ornament Stickers by Crate Paper; Bird Tag Sticker by Cosmo Cricket; White Velour Ricrac by May Arts; Brown Gingham Ribbon by CTMH; Pink Gingham Ribbon by Pebbles Inc.

This week on Practical Scrappers the designers were challenged to make paper crafted decor items. I love stockings but have yet to buy or make some for our family. I think I must be too picky because I never see any premade ones at the stores that I really like. So for now I used some of that darling Eskimo Kisses paper to create these mini 4" x 8" paper stockings, perfect for slipping in a few holiday treats, pencils, bookmarks, etc. I could totally go for these patterns in fabric ;) To make them was quite simple I drew a stocking shape and then cut out 2 pieces for each. Then I paper pieced the soles and cuff of the sock before sewing the whole thing together. I picked a different set of Thickers for each of our names and then embellished the stockings with stickers, ribbon, and buttons.


I wanted to keep Paul's stocking a bit more maculine so I stuck with the deeper reds and the green, both favorite colors of his. Instead of adding ribbon I used the twine to string the buttons together. I love the rustic look it gave his stocking. The dot paper is actually one of my last sheets of Figgy Pudding paper and it coordinated quite well with the new set. For my stocking I picked my favorite patterns then added just a trim of the ricrac and some buttons to finish it off. The velour ricrac is so fun and fuzzy, when I actually get around to making or altering some fabric stockings I'll have to find more of this stuff ;)


With the girls stockings I used some of the pinker patterns, especially on Audrey's and of course I had to use some glitter Thickers. I had actually tried putting Caitlyn's name across the cuff but it didn't fit and when I moved the letters some of the paper ripped. So to fix my mistake I added some of these fun stickers. And after adding stickers on Cait's I couldn't not put a little sticker on Audrey's. This little bird tag fit her so perfectly. Enjoy the stockings and stop by Practical Scrappers to see the other decor items! Have a terrific Thursday!

12.16.2009

Fa la la

Supplies : Paper, Elements, and Stickers by Cosmo Cricket; Rustic Cream cardstock, Jute, and Buttons by Papertrey Ink

Oh what fun it is to snuggle with your Christmas morning goodies! The girls got the most adorable stuffed ponies first thing Christmas morning last year. We had them waiting for them out in the livingroom and I think if that's all they had gotten they would have still loved Christmas more than any other holiday! Little kids are so precious that way. It reminded me of old Christmas stories when the children only got one or two gifts and they were always simple toys - a doll, a wooden pull toy, a small ball - yet they were so overjoyed. I loved the vintage toy element because it brought to mind that same thing and I knew I had to use it with the girls playing with their ponies that morning. They didn't ask about opening presents at all after getting them and we had to prompt the whole unwrapping gift fest, lol. I love that Christmas is so easy right now for them! Anyway, about the layout, I used the #36 sketch from Inspired Blueprints. I haven't really kept up with the layouts in the past few months but I still love visiting them for inspiration. Thanks for stopping by and enjoy the layout!

12.15.2009

Red and Green Christmas

Supplies : Paper - Figgy Pudding by Basic Grey; Tree Trimming Trio, 2008 Holiday Tags, and Signature Christmas stamps by Papertrey Ink; Cocoa, Olive, Bamboo, and Cranberry Ink by CTMH; Nestabilities Labels 1; EK 2" scallop punch; Epoxy Circles by EK Success; Diamond Scallop Edge Punch by EK Success;

Sparkle's extra Christmas Card Challenge this week was to use the classic red and green colors. I must confess that I don't use those colors often for Christmas! I broke out my Tree Trimming Trio and some Figgy Pudding scraps to put together this card. I finally used some of my clear circle epoxy stickers too. I cannot tell you how many times I've lost these things, lol. They and my 3D squares keep disappearing just when I want to use them! Anyway, this card was made for a set of cards that our friend wanted me to make for him to give to his family. The others are the blue flat bulk cards I made when I first got this set since he wanted flat ones for mailing to the rest of brothers and sisters. This particular card is for his mom since he wanted something more special for her. Below is the little stack all tied together. I included some envelopes for the cards since he's a single guy and probably doesn't think of that kind of stuff, lol. Enjoy and thanks for stopping by!


12.14.2009

A Christmas Story and a Stocking Stuffer

In Caitlyn's class they are doing a Christmas Story each day until Winter Break. Our room mothers set it up so that one parent comes in and reads a Christmas Story. Then they add something to each of the childrens' stockings that they made from yarn and paper the week before. It's so fun for the kids. I volunteer Thursdays and Fridays so I've heard plenty about it and how excited the kiddos have been since they started this last Monday. My day is today and this is what I put together for them. In case you're wondering, the story is about a little Mouse without a name who on Christmas Eve suddenly wonders if anyone ever thinks to give Santa a present. So he gets out his best cheese, the one he's been saving and wraps it up to give to Santa. The little mouse wakes up to Santa holding him and thanking him for such a thoughtful gift. He asks the mouse's name but the mouse confesses that he doesn't have one. Santa decides that he needs such a generous helper and gives him a suit, boots, even a beard and calls him Santa Mouse. It's a cute short story and I loved how it focused on the mouse giving to others. Our stuffers don't have to match the story but when I brought the book home I realized my little mouse stamp would go perfectly with it. The stuffer I made is simply a mini cello bag with a couple chocolate treats. I made sure each baggie got a figure treat whether it was Santa or a snowman and then tied it with some simple curling ribbon. I punched out the tags and stamped them all with the mouse stamp from the 2008 Holiday Tags collection by Papertrey Ink. It's my go-to stamp set for Christmas goodies and present tags if you couldn't tell ;D I added a single jingle bell and then curled the ribbon up. They look so cute all together! I know the kids will probably only care about the candy, but I can hope that when they pull these out of their stockings they'll remember the Santa Mouse story. Thanks for visiting and have a marvelous Monday!

12.12.2009

Cozy Campy Cocoa

Supplies: Rustic White Cardstock, Ocean Tides Ribbon, Jute, Warm Happiness and 2008 Holiday Tags stamp sets by Papertrey Ink; Mini Cello Bags; Twilight Ink by CTMH; 2" Scallop Punch by EK Success; Mug from Pier 1;

Here's another take on the mug gift set I posted a couple days ago. I remembered seeing some chocolate dipped marshmallows on Nicole Heady's blog a while back and thought it would be so fun to try. I got this fun Monogram mug from Pier 1 and the colors instantly made me think of camping, roasting marshmallows in the fire and making s'mores. I made more of the fun cocoa samplers and then added the marshmallows dipped in melted chocolate to the set instead of candy canes. In fact I had a little extra chocolate so I got to taste test some other marshmallows and boy are those little guys yummy! Marshmallows like to get stale in the air so if you aren't giving the gift right away to you can wrap them really easily with some of the mini cello bags and some twine or ribbon like I did here on the bottom post. Wouldn't you love to get a fun gift like this! This one is for Paul's brother. He's so outdoorsy and into camping that when I saw the mug I knew it would be perfect and the dipped marshmallows seem to just complete the campy s'more theme ;D I hope you enjoy and have a wonderful weekend!

12.11.2009

Tea or Cocoa

Supplies : Rustic White cardstock, Warm Happiness, 2008 Holiday Tags, and Everyday Classics stamp sets by PTI; Winter Cello Bags; Twirling Ribbon; Jingle Bells;

We have a pretty large extended family on Paul's side so instead of buying gifts for each person we do a Secret Santa where we each draw a name of someone else in the family. While that works wonderfully for us I like to try and make a little something for everyone that is inexpensive but still a fun treat to receive. I usually bake goodies but there are some instances where that isn't really feasible, like when mailing gifts (this is only because I'm ultra picky and want my treats to be received no later than a day after I bake them so they are as fresh and tasty as possible ;D ). So I made some fun gifty bags full of little goodies for the family members we mail out to. Using the same concept as the darling mug I posted yesterday I created a couple samplers, one tea and one hot cocoa. Each baggie has various flavors of tea or cocoa and then a bunch of fun chocolates like Irish Creme Kisses and Ghiradelli Peppermint Bark along with some candy canes to complete the set. One of those simple tags with the name of the recipient on the back along with a couple jingle bells finishes off the gift. I love making these because I get to share some of the little things I enjoy and they are easy to mass produce!


For all our nieces and nephews I made little stocking stuffer gifty bags whether they live near or far. I know the girls always feel extra special when another relative sends something just for them, so I wanted to do that for the kiddos in our family. Each baggie comes with a single serve pack of hot cocoa with marshmallows, a candy cane for stirring, and lots of fun chocolate goodies like the crispy rice santas and the funny chocolate christmas balls, all goodies my own kids love. This year I added one non-edible item that would be fun for them to use, the kiddos in school or starting school next year all got winter themed pencils with an eraser and the littler ones got a non-shatterable ornament to hang on their tree. One of my girls' favorite things to do is hang and rehang the ornaments on their trees so I thought that would be a fun thing for them to share with their cousins. And you'd be surprised just how much easier having a fun pencil makes convincing your Kindergartener to do their homework! I made ten of these little baggies and Caitlyn was so excited, especially since they are also doing stockings in her class right now. Everyday this week she has been asking about the stockings and the stocking gifts and when I'm doing the Christmas story and stockings in her class. This coming Monday I keep telling her but still she keeps asking, lol. So there's a little of what I'm doing this holiday season en masse for our big family ;D Thanks for visiting and have a fab Friday!

12.10.2009

Simply Sip and Enjoy

Supplies : 2008 Holiday Tags stamp set and Rustic Cream Cardstock by Papertrey Ink; Mini Cello bags; 2" scallop punch by EK Success

The Practical Scrappers challenge this week is Christmas gifts or wrappings and I thought how fun would it be to create a cute quick gift that costs less than $3? This darling mug is from Wal-Mart for just $1 with some sampler hot cocoa mixes I packaged in 4 mini cello bags and a couple of candy canes. We always keep various flavors of hot cocoa on hand in our house so I thought it would be fun to create my own single serve cocoa sampler with some of my favorite flavors as a fun gift that would also be easy on the pocket book. The flavors include Pumpkin Spice, Cinnamon Chocolate, Mint Truffle, and Belgian Dark chocolate. Each has a stamped tag with the flavor written on the back. Cute and cost efficient, I'm sure we could use a lot more of that during these rough economical times! The tags were also very easy and inexpensive to make. Simply punch out the circle, stamp, then punch a hole for attaching. I've made over 50 of these little tags for presents, bags, and little gifts like this all with just 3 sheets of 8 1/2 x 11, one stamp set, and one ink pad - all items I already had on hand. It doesn't get much easier than that! I hope you find a little inspiration from this little gift :D For more crafty gift ideas head on over to Practical Scrappers. We've been posting projects every day this week! Enjoy and have a terrific Thursday!

12.09.2009

Ornament Tags

Supplies : Paper, stickers, and elements by Cosmo Cricket; Buttons, Jute, and stamps by Papertrey Ink; Ink by CTMH; Marvy Snowflake Punch; Nestebilities; Shimmer Cardstock;

Tagaments or Ornatags? I made these out of some of the scraps with first the thought to make them tags but they morphed a little into paper ornaments. They were so fun to make whatever they are. I simply took the scraps and cut out various nestie shapes and sizes then added buttons, jute, stamping or stickers/elements to complete the little tag/ornament. They also fit perfectly in that little card purse I posted on Saturday. I can see now why making ornaments has so much appeal. You could get lost in creating these, each one different yet quick and so easy to put together! I don't know that I'll be putting these on a tree or if I'll be using them to go with gifts, but I can definitely say I'll be making them again next year! Enjoy and have a happy Wednesday!


12.07.2009

All Bundled Up

Supplies : Paper, Elements, and Stickers by Cosmo Cricket; Flair Button by American Crafts; Heavenly Blue Brads by CTMH

Here's one of the layouts I made with the Cosmo Cricket packet. I used one of the November Pagemaps layouts for this one. Audrey loved that hot pink jacket she got last year. I have pictures of her wearing it in July out in 110 degree weather! She would say she was cold just to wear it. Both of us were so distraught this year since she had to give it away because she had outgrown it by the time fall rolled around. Audrey because it was her favorite jacket of all time and me because she looked so stinkin' cute in it! Her little cousin will hopefully get as much use and love out of it as Audrey did. They are just over a year apart so she ends up getting all of Audrey's cute clothes ;D Both the girls had their cozy jammies on and were so cute all bundled and snuggled together Christmas morning and I loved how well their pjs matched the paper. Well, enjoy the layout and have a marvelous Monday!

12.06.2009

Wintertime

Supplies : Paper, Sticker, and Elementes by Cosmo Cricket; Rhinestones by Kaiser

Another simple card, this time for Sparkle's Christmas Card Challenge! Even though I didn't play in all of them, I am so glad I played in many weeks this year. I had more than enough Christmas cards made and even a few extras just in case. I love the colors in this, that radish red, eggnog cream, and crayon green. Hot cocoa with marshmallows and standing under mistletoe is what this color combo reminds me of. This was all made from scraps too which is an added bonus since you all know how much I love to use my papers on layouts first ;D Winter here is one of my favorite seasons. It doesn't get terribly cold, enough for sweaters and scarves maybe but you rarely need many layers with fluffy jackets. If we're really lucky we might get a day or two of snow in January or February, but for the most part we have mild winters compared to most places. And since my favorite clothes happen to be fallish, it's perfect that I can wear them all through the winter as well since it's not too terribly cold. Just cold enough to enjoy being chilled and appreciating pink noses and mittens, hot cocoa and quilts. Thanks for stopping by and don't forget to visit Sparkle's site for her Christmas card. Have a lovely Sunday!

12.05.2009

Holiday Purse and Tags

Supplies : Paper and Elements by Cosmo Cricket; Buttons, Jute, Rustic Cream Cardstock and 2008 Holiday Tags stamp set by Papertrey Ink; Ribbon by We R Memory Keepers; Marvy Snowflake Punch; Shimmer white CS from Pebbles; Tulip Ink and Brads in Holiday Red and Cranberry from CTMH; 2" scallop punch from EK Success

I used more of the Cosmo Cricket sampler I used to make the card yesterday to make some simple and quick tags. I'm loving the fun colors in this paper kit. They look like scrumptious Christmas candy! The tags were very simple, I just punched out some scallop circles from the rustic cream cardstock by PTI and then stamped some of the holiday tag images in Tulip on them. Then I added some ribbon and buttons since the patterns were already striped! Easy peasy, yes? Splitcoast Stampers had this fun template up for a little holiday card purse and I thought it would be fun to make with some of the scraps from my holiday layouts to put the tags in. My purse is actually shorter since I was using scraps and I housed some tags rather than the A2 size cards the template was for. This was so easy to make and pretty quick as well. I'm going to be putting together some little stocking stuffers for Caitlyn's class today. We're doing a Christmas story each day now with a stocking stuffer to go in their little paper stockings each day until Winter Break and mine is on the 14th. Very fun for the kiddos and I think the hardest part for me will be picking out a book to read. I want to find one that is fun, but not one that will have already been read. I'll be hitting the book store today as well to see what I can find ;D Have a great weekend and thanks for visiting!

12.04.2009

Home Sweet Holidays

Supplies : Paper and Elements by Cosmo Cricket; Ribbon by We R Memory Keepers; Buttons and Twine by Papertrey Ink; stickles and liquid glass

Simple and sweet, that's how I'm feeling about the season this year. With our family growing so fast, this last year we gained 2 nieces and a nephew and are expecting two more (one for sure a nephew) this next year I'm finding myself drawn to keeping my crafting more simple especially when it comes to the holidays! Time to create is so difficult to carve out no matter how much I want to right now so when I do create I want to be able to finish a project in lickety-split time. Practical Scrappers is doing all Christmas goodies this month so I took 5 minutes to whip together this card. Cute, sweet, and simple! I added some stickles to the snow and liquid glass to the window to add just a little something special. An added shortcut was to use part of the sample sheet from the Cosmo Cricket craft pack as the card base. All the patterns were already striped and all I had to add was embellishments! The girls and I have been having a lot of fun getting our home and gifts ready for Christmas. So much so that when Mich popped on by the other day she said it looked like our place had 'exploded with Christmas'. You can tell you're having fun with the holidays when your house has exploded with it, lol! Enjoy the card and have a fabulous Friday!

12.01.2009

Holiday Hair

Supplies : Paper and Elements by Cosmo Cricket; Flair Button and Thickers Letter Stickers by American Crafts

A simple layout to start off the holiday season. These were some silly photos of the girls with Christmas bows on their head from Christmas morning and I just had to include the one of Paul when Caitlyn had put her hairband on him so she could wear the tiara she got from her Aunt at our family Christmas party last year. I loved the little element that said "The season just isn't complete without a few ding-dongs" It matched the goofy photos so well! I had ordered the Cosmo Cricket craft pack right before I got sick earlier this month and am finally getting around to play with it. November has been pretty batty with all of us getting sick with colds, the flu, even a stomach bug and to top it off some vandal completely shattered one of our backseat car windows. Thankfully we were able to get the window fixed that next morning and we are all getting better finally :D I'm keeping my fingers crossed that none of us catch anything else for a while. While Caitlyn and Paul get over those things quickly, Audrey and I tend to have a much harder time. We have higher fevers, worse symptoms, and feels like it takes forever for us to get better. You can tell who got who's genes, lol. I hope everyone had a fantastic Thanksgiving though. We definitely had a great one. The meal was wonderful and the girls had such a blast playing with their cousins. With all the flu going around and the holiday craze our family hasn't gotten together since early October and it was so nice to see and chat with everyone. Hopefully I'll have at least a couple posts for you each week as I've got lots of Christmas goodies and such to make. So to get in the holiday mood this weekend we listened to Christmas music, put up the tree and decor, and I scrapped a quick and simple page to get my crafting mojo going. Enjoy and have a terrific Tuesday!

11.10.2009

Hoe Down

Supplies : Paper - October Afternoon; Journal Prompts, Text Tags, and Pig Stickers by October Afternoon; Remarks and Thickers stickers by American Crafts; Brads from Abbey Road by My Minds Eye; Ribbon from May Arts and CTMH; Cardstock Textured Sunflower from CTMH;

I've been getting sketchy lately since the Triple Challenge that Practical Scrappers was hosting along with Frosted Designs and Stuck on U Sketches. I used another Inspired Blueprints sketch from last month (#31). I flipped it horizontally then I added the journaling spot even though the sketch didn't have one. I just have a hard time not putting journaling on my pages ;) A bunch more October Afternoon papers and using some of that darling new Farm Fresh line, it's just way too cute! This was one of those 'forgotten' photos. I keep all my 5x7s separate from my 4x6 just because the photo box isn't that tall, so I had scrapped all the 4x6s that were supposed to go with this photo. Not that I'm minding at all. These types of mishaps have been forcing me to take my scrapbooking more casually. I don't try to make my albums chronological anymore. Lately I just slip in the pages in whatever order I make them :D I do have some specified albums like the Halloween one I just started and a Christmas album, but all the everyday stuff like this gets put in whatever order I've scrapped them in and it's so liberating to not feel like I have to have them all 'in order'. Anyway, I hope you've all been enjoying these bright cheery layouts! Have a terrific Tuesday!

11.09.2009

Simple Things

Supplies : Paper by October Afternoon; Flower Stickers and Journal Prompt by October Afternoon; Enjoy and Animals Remarks Stickers from American Crafts; Brads Abbey Road by My Minds Eye and Lemonade by Basic Grey; Ribbon by Making Memories; Basics 2 and Handwritten Fonts Slice Cards by Making Memories; Chocolate Cardstock by CTMH

This week the challenge on Practical Scrappers is on using white core cardstock. I used my favorite method on this layout, scissor distressing on my title! I love the soft comfy look it gives to any paper and with white core cardstock the distressing can help make your items gain more presence on the page. For me distressing is the biggest benefit to white core cardstock. Emboss it then sand the embossed image to really make it pop out. You can even sand the paper itself for a more rustic or linen look. Try crumpling your paper up, then laying it out flat and sanding lightly on the creases for great texture. Hold open your scissors and lightly drag it across the edge of your cardstock for easy scissor distressing, lighter for a softer look and harder for a more rugged or torn look. Speaking of tearing, white core cardstock looks great torn, where it can reveal a bold white edge! Score a border around the edge of your base page then sand to create a simple frame. Have fun distressing your titles and shapes cut with your die cut machine or punches, add texture to them by embossing, crumpling, or scoring first! Remember that a little can go a long way so keep it simple; distress a few pumpkins on a page, a title, or the base but don't distress everything so that the elements you want to pop from your distressing/texturing don't get lost on the layout :D I hope you've gotten some fun inspiration on how to use your white core cardstock. Hop on over to Practical Scrappers for more samples and have a marvelous Monday!

11.07.2009

So Lucky

Supplies : Paper - Oh la la by My Minds Eye; Flowers by Prima; Thickers by American Crafts; Cardstock honey by CTMH; Brads Abbey Road by My Minds Eye; Big Kids Card (Slice)

This was a super quick layout to put together probably because it was mostly put together by the time I used it. The To the Rescue page had actually started with these papers because I really wanted to use these on something. But after looking at it for a while I just wasn't feeling it and when I found that rainbow paper I became totally inspired and went from there. Later I thought I had to have some pictures that worked with this layout and colors and I found these ones of Caitlyn. The colors just helped the pictures pop and the mood of the papers matched the mood of Caitlyn's expression in the photos. I used the title So Lucky to go with her shirt and then journaled about how lucky we are to have her. I think a great challenge for this month would be to create thankful layouts about people and things in our lives that we're grateful for. Thanks for popping on by and have a splendid weekend!

11.06.2009

More Forest Friends

Supplies: Rustic White and Kraft Cardstock, Green Tea Leaves and In Bloom Paper, Forest Friends, Forest Friends Sentiments, and Vintage Labels, Buttons and Jute by Papertrey Ink; Sweet Leaf Cardstock, Sweet Leaf, Cocoa, and Sorbet Ink by CTMH; Apron Lace Punch by Fiskars

I created a couple more cards with the Forest Friends and this same color scheme. My favorite image in this set is the skunk. I haven't a clue why, I just like him a lot. I made another pattern using the Vintage Labels set, the cocoa on sweet leaf up at the top. I followed Dawn McVey's samples to create a lot of the backgrounds I stamped using this set. She really has an eye for making background papers and I love how easy they are to replicate! The little skunk is pop dotted up and I finally broke into my pretty In Bloom paper. I think it's so cute how he's in a little patch of flowers with that sentiment.


This other card was a lot of fun to make. Using another stamp from the Vintage Labels, I stamped out the background using cocoa ink on kraft. This was my favorite background out of the cards I made. I pop dotted the hedgehog like the skunk in the first card and finished off with more buttons. For the longest time I actually thought the hedgehog was a porcupine. I had been calling it a porcupine all this time until this last month when I was looking up ideas for this stamp set. Then I read he was a hedgehog. I had to look at the stamp again and then realized, oh yeah, he is! Anyway, enjoy the cards and thanks for visiting!

11.05.2009

Forest Friends and Vintage Labels


Supplies: Rustic White and Kraft Cardstock, Green Tea Leaves and In Bloom Paper, Forest Friends, Forest Friends Sentiments, and Vintage Labels, Buttons and Jute by Papertrey Ink; Sweet Leaf Cardstock, Sweet Leaf, Cocoa, and Sorbet Ink by CTMH; Apron Lace Punch by Fiskars

Sometimes I buy a stamp set I love and never really get around to playing with it. Forest Friends is a set I got almost a year ago and I think I've inked it up maybe twice. So I took it out seeing as it's getting to be fall and that always reminds me of wildlife and I set to work on making some fun cards. The Deer was the first card I made. I love these colors together, so earthy! The deer mat is up on pop dots for more dimension and I finally used one of those fabulous big PTI buttons. I have been eyeing them in this color set, I have just a couple more and I love that pearly shine they have! The pretty flourish background is a stamp in the Vintage Labels set which I am loving more and more each time I use it! This card went out to Sparkle and she got it a couple weeks ago ^_~ I'm just slow in posting!


This second card is a fun one that is going to my hubby with a jar of cashews (his favs) just for fun. I used the nuts from My Punny Valentine, I love that the PTI sets are so intermixable. Now I just need to decorate the jar. I always have so much fun doing altered projects but I rarely ever create them because getting started is the hardest part for me and I get intimidated by the extra steps. Which is funny because usually altering or decorating a little gift item is far faster than putting together a page. Maybe it's just the fact that it's 3D. Either way, I sit and look at my project for what seems like forever before I reach that get-go point and just create! I do with this quilts too, except it's even longer than with paper crafts!! Maybe that's why I haven't quilted in so long :D Enjoy the cards and have a terrific Thursday!

11.04.2009

To the Rescue

Supplies : Paper by Sassafras, My Minds Eye; Brads by Basic Grey; White Remarks letter stickers by American Crafts; Big Kid and Basic 1 Slice Cards;

Here is a completely non-traditional page, with not a bit of Halloweeny stuff in sight! I wanted to play with the blue, red, and gold that Caitlyn's costume is and I was drawn to this rainbow paper by Sassafrass so I pulled all the other papers and colors to coordinate with that pattern. The green background is also by Sassafras and looks a bit like linen which gives the layout some fun texture. With my Slice I cut the title using the font from Big Kids in some varied sizes and then cut some of the open stars from the Basics 1 card. Though neither of the girls were Cinderella last year, they both wore the dress quite a bit when the other was in their superhero outfit. It was so funny how whoever was the superhero had to 'rescue' Cinderella from nothing really in particular. Caitlyn would shout right away "Supergirl to the Rescue!" and after a while Audrey followed suit yelling "To the Rescue!" anytime she wore her batgirl costume. I hope you enjoy the layout! Thanks for visiting and have a super Wednesday!

11.03.2009

Hero Fashion

Supplies : Paper Eerie by Basic Grey, journaling paper by Creative Imaginations; Thickers and Remarks letter stickers by American Crafts; Black and White Cardstock; 1 3/4 Circle punch by EK Success; Apron Lace Border Punch by Fiskars

This layout ended up nothing like it started out to be in my head. First off it was horizontally striped before with only the two top photos. After lots of playing around I fell in love with the vertical placement. The circles were going to be small journaling prompts in a row on the right side which changed when I suddenly thought of doing the belt, boots, and bat mini journal spots. After that the rest of the layout was simple. There aren't any embellishements on this page as I wanted to keep the text the focal. I love the note next to Boots : for kickin' crime in the behind! Belt : to hold all those important gadgets.... and snacks. Bat : the perfect accessory is your favorite animal! Which is true for Audrey during Halloween. She loves Squeaky, their stuffed bat, and the book Stellaluna. Of course they are two completely different bats (vampire and fruit) but she doesn't care. A bat is a bat and bats are awesome :) My ultimate favorite about this layout has got to be that crazy pose she's doing in the bottom picture! She was trying to be strong, she said. So silly! I know it's after Halloween but I still have a few layouts left to post and sadly even after all these layouts I've only scrapped about half the pictures from last year, yikes! In my defense most of the pictures were not taken on Halloween but throughout October :D This year I'm proud to say I did much better. Anyway, enjoy the page and have a great day!

11.02.2009

4 a Moment

Supplies : Paper by October Afternoon; Journaling Prompt and Text Elements by October Afternoon; Owl, Cloud, Daydream sticker and Thickers Stickers by American Crafts; Ribbons by Pebbles Inc, CTMH, and Making Memories; Brads by My Minds Eyes Abbey Road; Apron Lace Punch by Fiskars; Sketch by Pagemaps

Practical Scrappers is teamed up with Frosted Designs and Stuck On U Sketches for a Triple Challenge complete with prizes from each challenge site this week! You can incorporate all the challenges like I did here on this layout, or you can make two or three seperate projects. The only catch is to qualify for the prizes, you need to do all three challenges. The Practical Scrappers Challenge for this week is to use up your ribbons! I'm almost as bad with ribbon as I am with paper. It's so easy to buy one yard here and there, then end up with a huge stash! Ribbon tabs are one of the easiest ways to add different patterns/colors of ribbon to your page without overwhelming it. It's also a great technique for using up those tiny ribbon scraps as well! I used some various sizes to give my ribbon more interest. Try cutting them at different angles or letting them fray for interest instead of making tabs. Use wider ribbon strips in place of pattern paper for texture or create flowers, leaves, sunrays, etc. The Frosted Designs Challenge was to use an owl someplace on your project and the Stuck On U Sketches challenge was of course to use a sketch :) I picked this cute owl from a set of American Crafts Stickers and rotated + flipped the sketch to fit my photo. Don't forget to stop by Practical Scrappers for the challenge and more inspiration on how to use up your ribbon and maybe even a few more samples using the triple challenge! Thanks for visiting and have a wonderful Monday!

10.31.2009

Happy Halloween!

Supplies : Paper by Pebbles Inc., My Minds Eye, and Creative Imaginations; Stickers by Pebbles Inc; Bat Ribbon by Making Memories; Glazed Brads Eerie by Basic Grey;

Happy Halloween! We have a fun day ahead for us with the festival at Tuachan and then a little Trick or Treating with their Aunt Mich. Everything is family friendly so no scary stuff allowed, my kind of Halloween festival! I love whimsical holiday decor. Most of our Halloween decor is black, orange, and white and the pieces are usually witchy. I did pick up a fun zombie thing this year and a darling vampire ornament from Pier 1 (links will take you to pictures of some of my favorite Halloween pieces of ours). Since the girls have gotten older decorating for holidays has become a bigger thing for us so I've enjoyed shopping for fun Halloween pieces to add to our little collection. This is a very simple layout of the girls last year. It's a very Pebbles style layout using some fun Pebbles paper and stickers! If you've seen their kits you know what I mean. The style is simple, blocked, and cutesy. The journaling is about how last year was the first year the girls ever picked matching costumes. I know they aren't from the same movie or comic but the fact that they were both superheroes is close enough for me! Since they are superheroes again this year I'm hoping we've started a trend of them matching for Halloween, at least for a little while! It's just so cute to see their costumes be all matchy :D


By the way both the girls did great at the Halloween party in class. Cait didn't melt down at all going through the older kids classrooms and seeing their scary costumes for the costume parade. She was even able to give some of them high fives. I think it really helped that the big kids were so encourging of all the Kindergarteners rather than trying to scare them :) They also got to go to a Halloween birthday party as well as our neighborhood party later that evening. All Friday they got to party! Here's a picture of them before class. I'm a bit sad that Audrey lost her mask someplace so she won't have it for Trick or Treating or the Festival today but oh well, at least I got some pictures of her before it happened. Maybe I can draw/paint one on her tonight. We'll see if she lets me :D Anyway enjoy and have a Hauntingly Happy Halloween!

10.30.2009

October 31st

Supplies : Paper and Stickers by Pebbles Inc; Brad by Imaginescence; Rhinestones by Kaiser; White Cardstock; Apron Lace punch by Fiskars; 3D foam squares

I have been loving this Pebbles sticker sheet. It's only about 6x12 but boy all those images sure do go a long way! I used basically the same style for this card as I was with the sticker minis, matting the sticker on cardstock and using 3D foam squares to pop it up. I added more rhinestones for some fun bling in the background and then substituted the O in October with a circle Trick or Treat brad. A very quick and simple card, can you tell I've been so in to those lately!
We'll be having Caitlyn's class party today. She's done SO much better this year. Last year I couldn't even take her to the grocery stores it was that bad! Carrying an ASD child whose having a major meltdown out of a crowded store while still keeping track of your other toddler is totally no fun. I was dreading when everyone would start putting out the Halloween stuff this year but Caitlyn hasn't seemed to be affected like she was last year. So we'll see how she handles the kids wearing their costumes in class. Audrey and I will be there to help if anything crops up but I'm hoping she'll be able to just have fun like the other kids ^_~ Thanks for popping on by and have a Freaky Friday! I'm pretty sure mine is going to be a least a little freaky with all those dressed up Kindergarteners!

10.29.2009

Nana's Halloween Tradition

Supplies : Papers Eerie by Basic Grey; Cardstock by Bazzil; Glazed Brads Eerie by Basic Grey; Bat Ribbon by Making Memories; Transparency by Fancy Pants; Halloween tag by My Minds Eye; Paper for journal strips by Creative Imaginations; Thickers letter stickers by American Crafts; Scallop, Labels 1, and Circle Nestabilities

Every year Paul's mom gets all the kids Halloween tees for Halloween. Last years were my favorite tees for Cait and Audrey. The girls love all of them of course. I think it's so fun for them to get a surprise the beginning of October like that. They love wearing them any chance they get, even when it gets close to Christmas time! I took basically the same style I had been playing with on my Practical Scrappers layouts but used some colored cardstock for the background and more photos. The transparency totally takes center stage, isn't it gorgeous! Trying to decide what I was going to use it on was tough so I just figured this layout right now. It highlights my favorite picture out the bunch. Last year I had that very photo as my desktop wallpaper for quite a while (until I took a new favorite sister picture). I just love Audrey's cheeser and Caitlyn's sweet look. Enjoy the layout and have an Eerie Thursday!

10.28.2009

Trick or Treat

Supplies : Paper and Stickers by Pebbles Inc; White Cardstock; Rhinestones by Kaiser; Brad by Imaginescence; 3D foam squares; Apron Lace punch by Fiskars

How about a regular sized card! The girls have really been into the Halloween treat thing and I have been more than happy to give away some of the huge stash of candy we have in our house! My downfall is the candy corns and those pumpkins. The girls, Paul and I all love them and though I try to use them more as decoration in my pretty glass pumpkin, they end up being snuck out as snacks by all of us! I probably should just not buy them but I cave every time. It's practically a tradition to have the pumpkin filled with candy pumpkins! Anyway, I hope everyone is having a blast getting ready for Halloween. Enjoy the card and have a Wicked Wednesday!

10.27.2009

Scaredy Cat

Supplies : Paper - Eerie by Basic Grey, lined papers by Creative Imaginations; Tag by My Minds Eye; Big Brads by Imaginisce; Glazed brads Eerie by Basic Grey; Spider brads by Doodlebug; Jute by Papertrey Ink; Scallop and Circle punch by EK Success; Apron Lace Punch by Fiskars; Circle Nestabilities; Spellbound Card (Slice)

Here's another layout for the fun punches challenge on Practical Scrappers. I used the border punch again and the scallop punch. This time though the scallop mats a circle that I punched to use for a journaling spot. I also die cut another larger circle for more journaling and just flowed my story starting with the small circle then continuing on to the larger one. Use your punches to create journaling prompts by punching out lined pattern papers or by creating your own using a journal lines stamp set. Hearts, flowers, stars, any shape you want can add a quirky journal prompt or subtitle to your layout. Try using your punched shapes to hold individual letters on a title. Use a heart punch in place of the O in Love or You. Use smaller shaped punches to dot 'i's and 'j's in your titles or as the dots in exclamation or question marks. I hope I gave you some fun texty ideas for your punches. Hop on by Practical Scrappers for the challenge and more inspiration! Thanks for visiting and have a terrific Tuesday!

10.26.2009

So Cute it's Spooky

Supplies : Paper - Eerie by Basic Grey and Creative Imaginations; Tag by My Minds Eye; Brads Eerie by Basic Grey; Bat Ribbon by Making Memories; 2" scallop punch by EK Success; Apron Lace border punch by Fiskars; Kraft Cardstock; Transparency by Fancy Pants

The challenge this week at Practical Scrappers is on using fun punches and I was so relieved when Christie said that border punches worked as well on this challenge because I really don't have many punches at all! Here I added some fun border detailing with the Apron Lace punch by Fiskars on the left side of the photo mat layer. Then I used part of a scallop punched circle as a tag for the beginning of the title. These little additions simply add a bit more fun to the layout. Use your border punches to add whimsy and don't stop at cardstock! Use pattern paper, or edge your journaling block or multiple journaling strips. Add a fun border to a photo mat or to the photo itself. Border punches are terrific for adding a shot of detail to a layout without having to add papers or embellishments! Stop by Practical Scrappers for more samples on what to do with fun punches and have a great Monday!

Holiday Pie

Supplies : Paper by Creative Imaginations; My Punny Valentine, Fancy Flourishes, and Signature Christmas stamp set, wood buttons and jute by Papertrey Ink; Creme Brulee, Bamboo, and Cranberry Ink by CTMH; Apron Lace punch and pinking scissors by Fiskars

Sparkle's Christmas Card Challenge this Sunday was to make a card that involved cooked/baked holiday goodies. What a fun challenge! Okay I know I probably say that about all of them, but yes they are all fun! I have been wanting to use this pie for a while and it's just one of the many things I hadn't gotten around to trying yet so I broke out my Punny Valentine set and made a simple homespun card. The crust is stamped in creme brulee the top rolled in brown bag so that it came out a little more 'golden' on the top ^_~ I used Fancy Flourishes for the steam in bamboo and then stamped both the sentiment and pie tin in cranberry for some pop. Wood buttons make a fun statement on the side of the card. A trick I learned was to turn some of them backwards to get that lighter color. Some of the buttons are less polished on the back too so it gives them a more woodsy feeling. A simple quick stamping card, I'm really loving quick cards lately! Don't forget to visit Sparkle's post for the challenge and her yummilicious Sarah Kay card (it's got cookies!) Have a lovely late Sunday night/very early Monday morning!

10.24.2009

Meowie Pumpkin Minis

Supplies : Paper and Stickers by Pebbles Inc; White Cardstock; Apron Lace Fiskars Punch; Rhinestones by Kaiser; 3D foam squares

More of these fun stickers on the minis! Rhinestones add a little bling again, I love how the tiny ones fit perfect on the odd eyes both on the cat and the pumpkins. These were the last two of the smaller square stickers and they rounded out my set of 8 minis just right for the girls' cousins. This weekend I'll be getting the Halloween goodies out to our family since we aren't doing a family get together this year for Halloween which actually works out better for us since Caitlyn has a class party, our complex is having a party, we have the ward trunk or treat party, and then both Paul and I are judging at Tuachan for Halloween contests as well! This year will definitely be the craziest Halloween season we've had! Thanks for stopping by and have a great weekend!

10.23.2009

Haunted Minis

Supplies : Paper and Stickers by Pebbles Inc; White Cardstock; Rhinestones by Kaiser; 3D Foam Squares; Apron Lace Punch by Fiskars

Aren't these stickers just so adorable! I saved the circle ones for my layouts and used the bitty square ones on these mini cards. That haunted house is too cute to be creepy. I added some non-halloween scraps to mat the stickers and give them more attention on the card instead of getting lost on that busy but darling background paper. I kept it simple with just a few rhinestones to accent. These Pebbles papers are double sided so even though I only had 2 different scraps on hand, I still had 4 different patterns to work with on these cards and I wanted to make sure that I made some with the spooky stripe. Two cards for one, it's hard to not get addicted to these mini cards! Enjoy and have a fabulous Friday!

For some regular life stuff Paul's appointment went well. His MRI results were good news, he has no new lesions since his last MRI which is wonderful since the previous 2 MRIs he had showed new lesions each time. Paul's symptoms have gotten worse in the past 2 months though, bad enough for us to assume he was having a relapse, and the neurologist thinks that might be attributed to stress and depression/anxiety exasperating his MS symptoms. There really isn't anything more they can do to help with the symptoms except try out some other medications. The important part is that his MS isn't actively destroying more nerves and that's the best news we've had with his MS in two years. The hopeful news about him not having a flare up is that it may mean he's headed toward some stable years. Out of the 9 years since he's been diagnosed he's had less than 4 stable years, so I'm praying that he gets some of them soon! Thanks for visiting!