10.22.2009

Halloween Class Treats


Supplies : Paper by My Minds Eye; White Cardstock; Journaling Lines, Around About Sentiments, and 2008 Holiday Tags Stamp sets by Papertrey Ink; Sans Alpha stamp set and ink by CTMH;

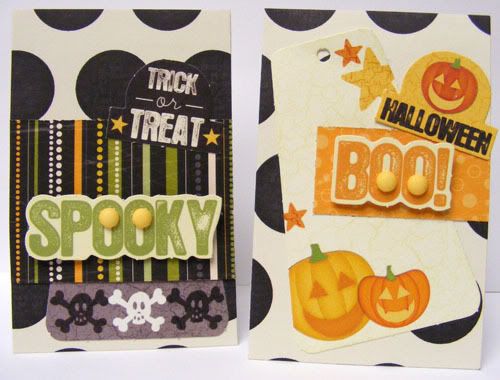
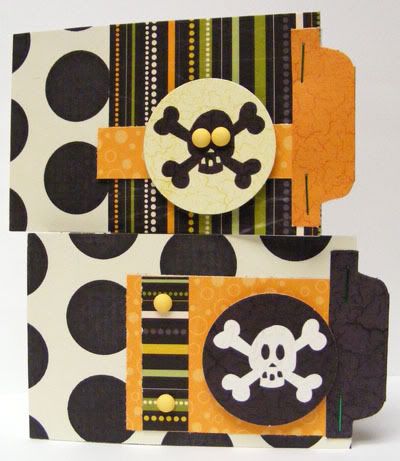
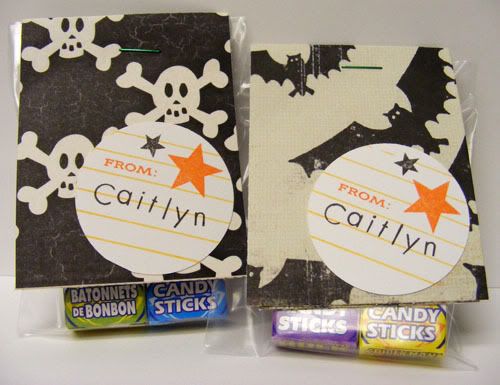
This year I thought it would be fun for the girls to give out more special treats than just a piece of candy. Caitlyn loves to give out paper crafted things and this was another simple way I could use up more Halloween paper that I'm not going to be scrapping with. These giftie bags also solved the problem of making sure each kid in her class got 2 of the super hero candy boxes. I cut my papers 2 1/2 x 4 for 20 kids and used up one full 12x12 sheet plus some scraps. I kept all of Caitlyn's papers black and white and you'll see why in a moment. For the tags I punched out 20 white 1 3/4 circles with my EK punch, then stamped the journal lines across each circle in sunflower. The stars are from the Around About Sentiments set and the From is from last years Holiday tags set, both Papertrey Ink. Last I used CTMH's sans alpha set to spell out Caitlyn's name and stamped it on all the tags. Easy peasy!


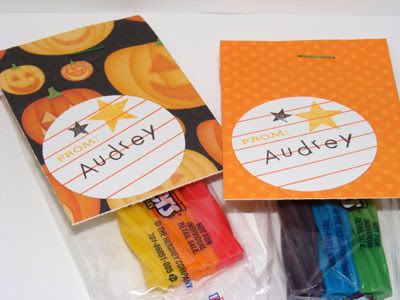
Since I volunteer in Caitlyn's class every Friday and I always have Audrey with me I thought it would be appropriate to make sure Audrey had treats to hand out to the class as well at the Halloween party. She has rainbow twizzlers to hand out which match Caitlyns Marvel Heroes candies even though it's Audrey who will be from the Marvel Universe. I kept Caitlyn's black and white and then did Audrey's with the orange and orange scraps just to help me keep better track of how many treats I was making and to give the girls something different from each other even if I made the same type of tags for them. I made the tags the same way just switching up the color scheme a little with my stamping. Both the girls are so excited. Caitlyn is going to be Supergirl again and Audrey is going as Spidergirl. They look so cute in their costumes! Caitlyn has actually gone back and forth between a Rocker Girl (like Hanna Montana she says) and Supergirl but I think when it comes to the party she'll pick Supergirl. Thanks for popping on by and have a terrific Thursday!

10.21.2009

Boo and Spooky Minis

Supplies : Paper by My Minds Eye and Pebbles Inc; Diecuts by My Minds Eye; Candy Dots by Pebbles Inc; 3D foam squares

With these minis I used up some of those big tags that I can't ever figure out how to get on layouts in a way that I like. On cards they were pretty easy though! I popped up the Boo and Spooky sentiments with 3D foam tape and added some candy dots in the Os for embellishment. More folder tabs add sentiments for a fun text filled card. All of the diecuts are from the same sheet that the skeletons were on in yesterdays post. It made putting these two sets of minis go by in a flash. All these mini cards that I'll be showing are inside the treat bags I made with the big pennant tags. The girls had so much fun signing the cards and getting the baggies ready for their cousins. Enjoy and have a wonderful Wednesday!

10.20.2009

Skull Minis

Supplies : Paper My Minds Eye and Pebbles Inc; Die Cuts by My Minds Eye; Candy Dots by Pebbles Inc.;

I made a discovery that I am totally going to be using again and again - Mini Cards. A regular A2 card just cut in half. 2 3/4 x 4 1/4 is the size of each of these minis and they are just the right size for kids! They were also the perfect size to use up these diecuts I got last year that I know I won't be using on layouts. I used scraps from the pennants and other Halloween layouts to create these minis for the nephews. I thought the big buggy eyes on the top were so funny and so did Caitlyn. She laughed so hard when she saw that card! The diecuts come from a cardstock sheet which included the skeletons and the file folder tabs. I thought the tabs made a fun and simple addition to the cards. Paul and I will be heading up north bright and early this morning for his MRI and Neurology appointment. Hopefully the doctor will have some positive news for us. Thanks for stopping by and have a great Tuesday!

10.19.2009

Halloween Goodie Bags

Supplies : Paper by My Minds Eye and Pebbles Inc.; Journaling Lines and Around and About Sentiments stamp sets by Papertrey Ink; Say It In Style stamp set and inks by CTMH; Cello gift bags; Black Organdy; 1 3/4" circle punch and 2" scallop punch by EK Success

If you noticed on my second banner in Saturday's post there were some triangles that had text on them. Being picky about making sure my text is right side up that meant I ended up with 2 spare pennant triangles. I also had a couple odd number triangles from the banners as well. I couldn't just toss them out so I put them to use on these little gift bags. I don't have any Halloween stamp sets, though I loved this years release by PTI. I had to choose between Christmas and Halloween.... Christmas stamps won out :) So I got creative. I used the stars from the Around and About Sentiments stamp set and gave the tags a notebook feeling with the Journaling Lines stamp set. Then I added the simple sentiment from Say it in Style by CTMH. After putting the tag sets together I realized the upsidedown pennant looked a little like a witch hat! Perfect for halloween. Each baggy comes with goodies and a mini card from Caitlyn and Audrey, one baggie for each of their cousins. I ended up with 8 baggies though the others are the same as these designs. So there's an idea on what to do with your extra pennant triangles if you have them. Enjoy and have a marvelous Monday!

10.18.2009

Cozy Up for Christmas

Supplies : Paper by Imaginisce; Snowfall and Signature Christmas stamp sets and button twine by Papertrey ink; Twilight Ink and organdy ribbon in white and col white by CTMH; Button by My Minds Eye; Apron Lace punch by Fiskars; Embroidery Floss; kalidescope glitter embossing powder

It's been a few weeks since I've played in Sparkle's Christmas Card Challenge. I miss getting to sit down and craft every Sunday. Today I got a chance to so I logged online to see if there was an added challenge this week and there was - to use winter clothing. This was the perfect challenge to break out my favorite winter set from last year : Snowfall by Papertrey. I did something fun with the mittens that I haven't done before. I glitter embossed the image on pattern paper for a fun shimmery mitten. You can use glitter embossing powder or make your own by mixing a little bit of prisma glitter with clear embossing powder half and half. I stitched some simple snowflakes with white embroidery floss and then sewed a little more detail on the wrists of the mittens since the clear embossing didn't really show that stamping detail very well over the pattern paper. One large button adds to the cozy theme. I love the fall and winter, the cooler weather, warmer clothes and colors, and that cozy feeling where you just want to snuggle at home under a warm quilt and watch a fun flick or read a good book. It's still fairly warm here (it got up to 90 this weekend) and I really can't wait for it to start cooling off! Don't forget to visit Sparkle's blog for the challenge and her darling hanging winter clothes card. Have a lovely Sunday!

10.17.2009

Halloween Banners


Supplies : Paper by My Minds Eye and Pebbles Inc.; Ribbon by Pebbles Inc.; Cardstock scraps - LSS and CTMH; Die cut Patterns from Spellbound - Slice

This was such a fun project! I had seen these pennant banners here and there and since Halloween has become a rather large holiday for us I figured it would be fun to try out making one. The instructions are at Splitcoast but for a quick overview you will need a 12x12 sheet of paper for every 6 triangles you want to make. Cut your 12x12 sheet in half so that you have two 6 x 12 pieces. Across the top of each piece use a ruler to make a mark at 1", 6", and 11". Then across the botton of each piece mark it at 3 1/2" and 8 1/2". Draw a line to connect or do like I did and just line up the diagonal marks and cut. I trimmed my pennants with edging scraps cut with my mini scallops and pinking deco scissors. I then cut the 2 1/2" letters with my Slice from various scratch papers and then did the same with the fun pumpkin, date, and bat elements. Using my 1/8" hole punch I punched two holes in each top corner and thread a long bit of hemp to hold the banner together, then tied loops for hanging at the ends. Buttons on the pumpkins and some ribbon finish it off. Because I didn't have any single pattern of ribbon long enough for the entire banner I used 4 different patterns trimmed to size which did double duty as embellishment and hiding the punched holes and strung hemp. This was such an easy and fun project to make!


Here are a couple closeups of the pumpkin ends on the large banner.


This is a smaller banner I made using other My Minds Eye papers. I had acquired quite a stash of Halloween papers and many of them I realized I probably won't get around to using on pages. I've been trying to use things up as I buy them and use up my stash as well since it's getting larger than I like. These pennant banners were a great solution and I ended up using 6 full 12x12 sheets and many scraps.


Another closeup, this one of the bats by the moon. I really like the simple shape silhouettes offered by the Slice. I use it mainly for alphas but I'm finding the images are really fun too! Enjoy and I hope you all have a wonderful weekend!