3.30.2010

Sunny Shine

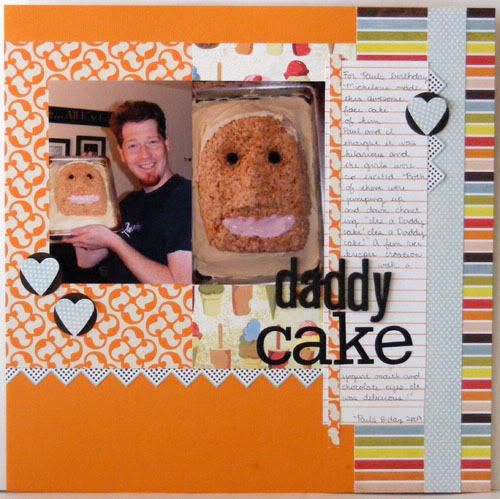
Supplies : Papers - Adobe by American Crafts; Cardstock by AC; Dear Lizzy Rubons by American Crafts; Journaling Lines stamp set and Summer Sunrise Ink by Papertrey Ink; Circle Nestabilities; Just Chilling Slice card by Making Memories; Apron Lace border punch by Fiskars; Sewing Machine and white thread

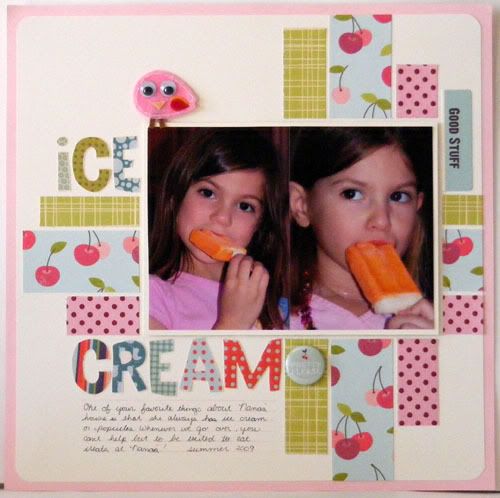
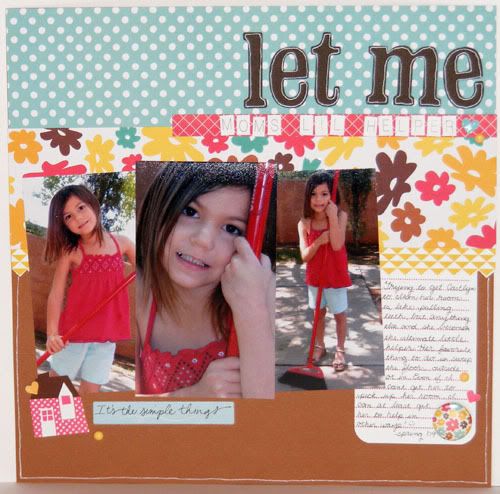
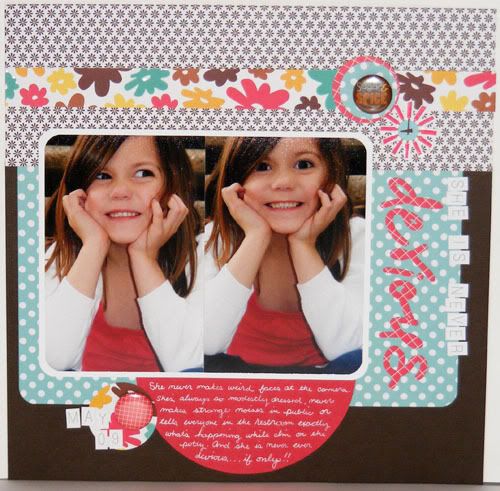
The supply challenge on Practical Scrappers this week is Rubons! I have been loving the new rubons by American Crafts, they are so fun and cute. These ones are from the Dear Lizzy line. I was looking for ideas in my inspiration folder on my hard drive and came across a layout I think that Kelly Purkey made. I used the basic design and even added butterflies to my layout like she did. My favorite part is the tone on tone border punched piece sewn to the base, so subtle yet so pretty! It's hard to capture those kinds of details on the camera, it shows up so much better in real life ;) I used the 'shine' rubon to finish my title and then added another sunshine journal blip to the bottom right to continue the theme. I love the way this came out, with more bold color blocks and just a tad of that darling flower print. Enjoy the page and thanks for stopping by!

3.28.2010

Daddy Cake


Supplies : Stripe and Dessert Paper by Basic Grey, Orange print by Pebbles Inc, and blue dot by My Minds Eye; Border by Pebbles Inc.; Journaling paper by Creative Imaginations; Thickers and Remarks letter stickers by American Crafts; Cardstock by American Crafts; Circle and Heart punches by EK Success;

Trying to use up more scraps ;) I used a March Pagemaps for this layout, another resized 8.5x11. This was such a funny cake. Paul's sister wanted to do something different for him this year so she made this cake of Paul. The girls called it the 'Daddy cake'. I was happy they took pictures since I was out when she brought it over and Paul and the girls had eaten a big chunk of the Daddy cake before I got home, hehe. Too fun! Enjoy the layout and have a lovely Sunday!

3.27.2010

Lolly Bath


Another repurposing project, this time using a small Amazon box and more MME papers that I wasn't going to use. It was the perfect size for a little bath and I even had a large part of the water bottle cardboard still sitting around. A toilet paper roll helped make the faucet come together. I made a lot more flowers from the scraps of this one and of course had to add some to the tub to make it chic like the bed ;) Cookie and Snowball are getting a bath, good thing they aren't too opposed to pretend water! Though it does look a little like Cookie is trying to get out! Thanks for visiting!

3.26.2010

Such Dolls!


Supplies : Paper, Remarks Stickers, Spring House Chipboard Shapes, and Rubons from Dear Lizzy by American Crafts; Cardstock and MiniMarks Rubons by American Crafts; Journaling Lines stamp set and Melon Berry Ink by Papertrey Ink; Apron Lace Fiskars Punch

Today's Sketch Friday Sketch for Practical Scrappers is provided by Lucy and what a wonderful sketch it was to try out some of the Dear Lizzy goodies I picked up. My favorite is those chipboard dresses. Aren't they so sweet! They remind me of all those darling baby dresses the girls had. I love these papers too, the only thing I don't like is that I'm having such a hard time matching the red. I found some scraps in my stash that matched, I'm pretty sure it's AC cardstock so I think Pebbles must have just been out of that particular red when I bought the papers since I didn't find any that worked then and this one coordinated perfectly. I'll be taking a piece when I go next time to see if it's back ;) Enjoy and have a fab Friday!

3.25.2010

Lily's Bed


A no cost dolly bed! Heidi mentioned on my Tuesday post that she has a hard time letting supplies go and I have to admit it's not always an easy thing for me to do. Sometimes the paper is just too pretty even though I know I won't scrap with it. In this case I made the bed out of a cereal box, the cardboard bottom on my bulk water bottles, and some plastic bags. The bags were used as filling inside the cereal box. I used the sides of the water bottle base to make the bed's bottom base pieces and the center large piece was cut down to make the headboard. I covered the bed with these lovely My Minds Eye papers that I knew I wasn't going to scrap with but couldn't seem to put in the 'purge pile', lol. I used up 4 12x12 papers to cover the bed and finished off the scraps to make flowers. A couple ended up on the bed, so pretty and chic! Now Audrey has a darling bed for her doll and I have some gorgeous flower embellies! A fun way to upcycle some trash and use up my stash ;) Later I'm hoping to sew a little pillow and quilt to complete her bed.


Even though the bed is Lily's it seems Snowball and Cookie have taken a major interest in it. Which is fine for now since all the other lollies will be jealous that she has a bed and they don't yet ;) Thanks for popping by and have a terrific Thursday!

3.23.2010

I'm here for you

Supplies : Paper by My Minds Eye and Making Memories; Vintage Picnic Sentiments and Ink by Papertrey Ink; Flower by Prima; Button by My Minds Eye; Twine by Papertrey Ink; Colored Pencils; N0 Copic Marker;

How are you at using your old supplies? The challenge at Practical Scrappers this week is to use supplies that are over a year old. The stamps are newer, the image is a digital from The Stamping Boutique and the sentiment is from Papertrey's Vintage Picnic Sentiments set. The image was colored with pencils. I have to admit it was fun to color in an image, it's been quite a long time since I've done it so I hope she turned out alright.

Speaking of old supplies I confess this was a very difficult challenge for me since I'm a chronic organizer and a purge freak. Seriously, I go through my stash at least every couple months and 'reorganize' my space which usually ends up with me purging anything that I feel I won't use. I do have to mention that I don't have a huge scraproom or a ton of supplies (click here for my scrap space and yes it's changed a bit since then. I think I have less stuff now, lol.) Simply put if I have too many supplies I feel more stumped when I create. Reorganizing helps me to remember all the fun goodies I have and purges help me reassess what I buy. It's an ongoing journey for me and I'm sure it'll always be that way but for the most part I like how I rotate through my stuff. Just a little bit about my stashing habits or lack thereof while we're on the subject of using old supplies ;) Thanks for reading my ramble and have a happy Tuesday!

3.21.2010

Sweetness


Supplies : Paper Blue Skies and Letterbox by American Crafts; Remarks Stickers and button flair by American Crafts; Journal and tag stickers from Farm Fresh by October Afternoon; Just Chilling Slice card by Making Memories; Ribbon by American Crafts; Dear Lizzy Rubons; Adobe AC Paper for title; AC Cardstock; Paper Shapers Scallop Scissors;

Here's a sweet quick layout I put together from more AC papers. Some sorta smiles from Cait. It's so hard to get good pictures of her right now. She always gives the camera that weird fake smile and it's nearly impossible to get candid shots of her since she's such a poser, lol. I can't wait until the fake smile phase is over. Anyway, I hope you enjoy the layout and have a lovely Sunday! Thanks for popping by ;)

3.20.2010

Ice Cream Pretty Please!


Supplies : Papers by October Afternoon; Title cut from Cosmo Cricket Paper; Cardstock; Sassafrass bird feltie; Dear Lizzy Button Flair; October Afternoon journal card (good stuff); Journaling Lines stamp set and Hibiscus Burst Ink by Papertrey Ink; Corner Rounder by EK Success

Here's my layout for the Friday Sketch at Practical Scrappers. I only saw it last night as I've finally gotten back in the habit of getting online. With all my future posts I'm sure you guys didn't notice ;) For the last 3 weeks I've been on the computer all of 2 times. Well Friday was the third. It was really nice to not have to worry about turning it on, though I did miss a whole lot of great inspiration on my fav blogs. I've no hope of catching up on reading them, but I think it was well worth a break from our tech crazy world. For Shanna, yes I've been to MADE. Love her stuff! I've been going crazy with other crafty sites like Hand Made Mommy, Susan Weinroth, Made by Joel (a crafty dad!!), Made by Rae, Make It and Love It, MMM Crafts, Noodlehead, and Craftiness is not Optional if you want to check them out ;) That's not including all the quilting sites I've been going gaga over. If only I were that talented, ha! I'll stick to paper crafts for now. And thanks for the sweet comments. It was so fun to read through them! I peeked at the sketch again after lunch today and thought to get my crafting groove back on. Here's what I came up with. All the pattern papers are scraps which makes me so happy to use them! Plus they are of some of my fav papers, I adore that cherry print from October Afternoon. Enjoy the layout and if you want to play along visit the Practical Scrappers blog for the sketch. Have a fabulous weekend!

3.16.2010

Eskimo Kisses

Supplies : Paper Eskimo Kisses by Basic Grey; Kraft Cardstock; Velvet ribbon by My Minds Eye; Chipboard by Basic Grey; Rhinestones by Kaiser; Stickles; Thickers letter stickers by American Crafts; Kisses sticker from Valentines set by Pebbles Inc.; White Embroidery Floss

I couldn't help but to use that title on a page, especially since Audrey is such a kissy girl. Doesn't it fit perfectly! The Practical Scrappers Challenge this week is using Chipboard. I decided to make it ultra easy on myself and use the Eskimo Kisses line of papers and chipboard ;) And even easier by using a January Page Maps layout. In fact the only difficult thing on this layout would be the stitching and that was more time consuming than difficult because I hand stitched it. I did add a little fun bling to liven up my chipboard pieces, some hot pink rhinestones and stickles make them shine up. This is one of my favorite pictures of Audrey and when I picked up the papers I knew I would have to use these little eskimos with some of the pictures I took of her in her hot pink sherpa coat. By the way, you know how sad Audrey was when we had to give this one away. Well, she had gotten a new one for Christmas ;) It's not hot pink, just the traditional tan but with lots of cute embroidery and she loves it! She wears it just as much as the other one and the great thing is that it matched her cute little sherpa boots too. I hope you enjoy the layout as much as I do and have a super Tuesday!

3.14.2010

Spoiled

Supplies : Paper - Blue Skies and Letterbox by American Crafts, Scenic Route; Remarks Stickers and Thickers Letter Stickers by American Crafts; Flower and tag Stickers from Farm Fresh by October Afternoon; Circle Nestabilities; American Crafts Cardstock; White Gel Pen; Journaling Lines stamp set and Melon Berry Ink by Papertrey Ink; Ribbon by Making Memories;

What a silly layout this turned out to be! It actually gave me a lot of trouble design wise, mostly with the picture placement but in the end it came together nicely. I love the orange shaped journaling circle. I cut the leaves from the background Scenic Route paper and then free handed the stem, adding it to a Nestie cut circle. With the paper still in the Nestie die I stamped the journaling lines so that I would have a nice space around the edge, then I used my white gel pen to give it a more distinct outline. Too fun! The pictures crack me up. About a month ago I did a Tutti Fruitie layout with the happy pictures from this photo shoot. These particular photos were so snotty and cute I had to print and use them on a grouchy layout. After all my kids aren't always little angels ;) Thanks for popping by and have a lovely Sunday!

3.13.2010

Salt and Pepper


Take a couple large wooden thread holders and a couple large circle dome tops, add some paint and instant salt and pepper shakers!! This was not my original idea, I saw it on another mom's blog (that I can't seem to find the original post for now) and thought what an awesome idea so I had to try it out. For $2.50 you can make some quality wood shakers in whatever color you like! Enjoy and have a great weekend!

3.10.2010

New Play Food Boxes

From Ugly:


To Cutesy:


How fun is that?! Not that this is new or innovative in anyway, people have been recovering boxes for decades, but for me this was a very fun project. I got to use papers I don't care for to make super cute boxes for my girls' kitchen play stuff (and of course now I love them since they look so darling as boxes!) The plastic front of the spaghetti box is actually from the packaging of one of my scrappin' goodies too so a bit of upcycling going on here. I am in the process of creating a fun kitchen playset for them so more repurposing (and sewing) to come! For those of you wondering the spaghetti is just yellow yarn and the meatballs are pompoms. My girls LOVE making spaghetti and meatballs for their dolls and stuffed animals. The peas are the small green pompoms, I'll be making some felt food later, these were just really easy to throw together on short notice for the girls to play with. Papers were by My Minds Eye, the cardstock is Bazzil. The peas were made by just cutting out some of the green lanterns on the other side of that green pattern paper. I simply free handed the titles with a sharpie, no need for it to be perfect. I might punch out some meatballs from either the scallop or regular circle punch to decorate the spaghetti box more. The girls took them and ran so I figured they were cute enough right now ;)

3.09.2010

Let Me

Supplies : Papers Adobe by American Crafts; Yellow Border from Monstrosity by Sassafras; Remarks Letter Stickers, Adobe Stickers, Dear Lizzy Rubons, and Button Flair by American Crafts; Journaling Lines stamp set and Pure Poppy Ink by Papertrey Ink; Yellow Candy Dots by Pebbles Inc., Just Chillin' Slice card and Slice by Making Memories; White Gel Pen;

Have you noticed all the projects I've been posting using my White Gel Pen. That's because it's the supply challenge at Practical Scrappers this week! I love white gel pens but before working on my project for the challenge I hadn't really been giving mine much love so that was fun motivator for me to use it more often again, especially on layouts. Here I used my pen to outline the cardstock title for some extra detail and along the bottom half of the layout for a thin frame. Make faux stitching with your white pen or just doodle some fun details, even journal on darker papers for a change like I did with Sunday's layout. This page also used another February Page Maps layout. As for the pictures, they are of Cait trying to help me sweep the walkway. She's at that age where she wants to help clean and tells me often that these are her 'chores'. Of course she'll do anything except clean her room, the one chore I want her to do, lol. I think every parent has this battle though. Most of my friends say that it's near impossible to get any of their kids to clean their rooms, yet other chores aren't nearly as bad. I can hope that will change, but I'm thinking I should just be happy that she wants to do other things to help without whining and complaining yet. Enjoy the layout and have a terrific Tuesday!

3.07.2010

She Is Never Devious

Supplies : Papers Adobe and Letterbox by American Crafts; Remarks Letter and Adobe Stickers, Button Flair, and Cardstock by American Crafts; Handwritten Fonts Slice card by Making Memories; White Gel Pen; Circle Nestabilities

I picked up some of that fun Adobe paper and had to play! This layout is from the February Pagemaps. It was an 8.5 x 11 page that I turned and stretched to fit 12x12. Inspiration for this layout came from this post by Ruffles and Stuff. She's amazingly talented, always altering clothes for both herself and her darling daughter. If you love to sew/alter clothes, especially girls clothes her blog is a must see! No I haven't really dared to sew clothes yet, but I love seeing what other people make and maybe one of these days I'll finally try it out, hopefully before my girls get too big to object. When I read her outtakes post I just knew I had to create a page on that theme using these mischiveous outtakes of Caitlyn ;) The journaling talks about all those things that she 'never' does and ends with an 'if only'! I hope you enjoy the page and have a lovely Sunday!

3.06.2010

You Float My Boat

Supplies : Paper by My Minds Eye; Cardstock by Bazzil; Ocean Tides and Fresh Snow Ink, Tiny Treats Valentines and Heart Prints stamp sets by Papertrey Ink; Basics 1 Slice Card by Making Memories; Sharpie and Copic Markers; White Gel Pen

Sometimes a project I make ends up nothing like the idea I started with. My Friday Sketch layout, that cute sunny page, was originally going to have the title 'Float'. I cut out the letters using the last of these blue scraps and was ever so proud of finishing off some papers, but as I lay them on the layout it just wasn't inspiring me. So I set aside my title and finished the layout another way, which I ended up liking much more. In the meantime the poor little title sat pushed aside on my table and I really didn't want to just toss the letters. I knew I wouldn't use it on another page so I thought to try and make it into a card. Quite a different style for me but it was fun and easy and the only thing I would have changed was to use the smooth side of the bazzil since the textured side was a real pain to write on, lol. Lesson learned there ;) The hearts were an after thought, that top part just seems too empty and the boat is pop dotted for dimension. Anyway, enjoy the card and thanks for popping by!

3.05.2010

Sweet Blissful Sunshine

Supplies : Paper from Oh La La by My Minds Eye; Dear Lizzy Rubons for title; Letterhouse Chipboard shapes, Elements Fabric Brads, and Remarks Blue Skies stickers by American Crafts; Yellow Candy Dots by Pebbles Inc.; Scallop/Diamond border punch by EK Success; Melon Berry Ink and Journaling Lines stamp set by Papertrey Ink;

It's sketch Friday at Practical Scrappers! I didn't get a chance to make my sample earlier this week but I did get to quickly make a layout using the sketch after we had dinner tonight ;) The moment I got the sketch in my inbox I knew I would be using this paper, it was practically made for the sketch! And I love how the rubons layered so well, making a perfect custom title for my page. Before this year I had always had a hard time using rubons. Maybe it was the previous styles or maybe I've just learned how to use them better ;) Either way I'm having a blast using them on pages of late. Our girls enjoy summer so very much, all the swimming and going to the waterparks. It's a lot of fun for all of us especially since summers here are REALLY hot!! With the spring weather coming up I've been in the mood for more bright and sunny pages and this page is definitely sunny! I hope you enjoy ;) Take a peek at the Practical Scrappers blog for the sketch if you want to play along and have a fab Friday!!

3.03.2010

Love is in the Air

Supplies : Tiny Treats Valentines and Take Note stamp sets and Inks by Papertrey Ink; Paper and Cardstock by Papertrey Ink; Copic and Sharpie Markers;

After making the fun brayer fish card I posted yesterday I was in the mood to play with this little plane from the same stamp set. I know it's way past Valentines, but I have been loving these tiny images. I knew I wanted to make some fun clouds for a simple card and at first I was going to do a blue background and white clouds. Instead I ended up mixing it up and I love it! Inspiration was from Caitlyn's coloring, her use of colors made me go out of my box to have a fun flowered sky and blue clouds. She's been getting into monochromatic pictures lately too. When I had made this card she colored one monochromatic pink Hello Kitty page and one mono blue page - which is what inspired the monochromatic blue in yesterday's card. It's fun to see her pull out all the pink shaded crayons and go to work, she even does shading or adds darker lines here and there on her pages. Such a little artist! The other day she added 'paint' to Hello Kitty's face and hands on a picture because she was painting and Cait said she got messy, lol. Anyway, back to the card I also used the Ink Challenge on Practical Scrappers this week and sponged the edges of my clouds with Spring Rain to give them a little more depth. It just adds that little extra something ;) Anyway, enjoy the card and have a happy Wednesday!

3.02.2010

You're a Great Catch!

Supplies : Tiny Treats Valentines stamp set, Aqua Mist, Ocean Tide, and True Black Ink by Papertrey Ink; Cardstock by CTMH; Copic Markers; Versamark Marker; Clear Embossing Powder; Glazed Brad by Basic Grey; White Gel Pen;

Wondering how to use your inks? That's the challenge at Practical Scrappers this week! The first thing that comes to mind when I think of my inks is stamping images with them, the next is distressing. But what about something a little different? Here I created a gradient for water on my card and used an embossing resist to make the fish stand out. First I stamped and colored my images. Next I took my Versamark marker and outlined a fun splash design then colored it all in, right over the fish. This gives something for your embossing powder to stick to. I sprinkled on a good bit of clear embossing powder and shook off the excess before heat setting it. You can tell your embossing is done when it gets shiny. I had missed a couple spots so I went back in with my Versamark pen and colored the spots in, sprinkled more powder and set. The heat will blend it all together ;) Next is the fun part with your ink. I was using a light blue cardstock so I picked the matching ink color and then another darker shade (if you're using white cardstock you may want to try using 3 shades of ink). I filled up my brayer with the lighter ink first and leaving about half an inch of bare cardstock at the top I brayered my ink over the panel until it was well blended. Then I filled about half of the brayer with the darker ink and started about half way down the card to brayer that color on to create the gradient. I finished off the panel by wiping off the embossed section with a baby wipe. Because embossing can warp the paper I let the panel sit under a heavy book for a while to give it back it's shape. Then I attached the panel to a card base and added the sentiment. To make the resist method faster you could simply stamp a solid stamp in versamark instead of drawing it out like I did. The gradient brayer effect also looks beautiful with stamped silhouttes as well as resists. Flowers in a sunset, bare trees in winter, you could use pretty much any solid stamp to get a silhoutte look! Head on over to the Practical Scrappers Blog for more fun examples on how to use your ink ;) Thanks for popping by and have a terrific Tuesday!