9.30.2009

Merry and Pink

Supplies : Rustic White Cardstock, Tree Trimming Trio, Background Basics : Retro; and Signature Christmas Stamps by Papertrey Ink; Blush and Tulip Cardstock and Inks (Sweet Leaf, Cocoa, and Tulip) by CTMH; Kraft Cardstock from LSS; Fiskars Apron Lace Punch, Nestabilities Label 1 smallest die; 1/2" circle punch

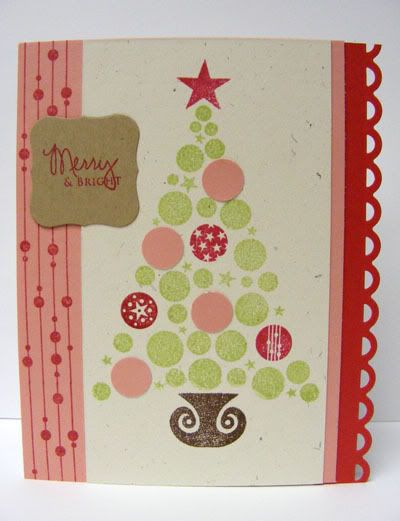
I loved my first set that I made on Sunday that I wanted to try out making more bulk flat Christmas Cards again. This set will be gifted to my SIL since she loves giving out handmade cards but thinks she's not creative enough to do it herself. I think she just needs to sit down and try it out with me, but convincing her to do this hasn't worked yet so I'm making some for her ^_~ This set made 6 and I cut the Rustic White to 2 3/4" x 5 1/2". This makes 4 with that size and 2 that are 3" x 5 1/2" if you're using an 8 1/2 x 11 sheet. I stamped the ornament tree in Sweet leaf, then the base in cocoa, and the ornaments and star in Tulip then set it aside. I then took one 12x12 sheet of blush and cut the pieces 4 X 5 1/2. On the left of the blush I stamped one of the retro backgrounds just once horizontally. Because the stamp doesn't go the entire heighth of the card I inked up 1/3 of the stamp again and then stamped the remaining border. Then I took a scrap of Tulip, punched with the apron lace, and trimmed for the edges. Each piece ended up 3/4" x 5 1/2". I put the card together attaching the edging to the card base before putting the blush piece on top and then last the tree panel lining it up next to the border I had stamped. The tree looked a little sparse so I punched out 1/2" circles from the blush scraps and added them to the trees. Then I took a 1 1/2" x 12" scrap of Kraft and cut out 6 of the smallest label 1 nestie dies. I stamped the Merry and Bright in Tulip and then added the sentiments to finish off the cards. These six like the eight last week, also took about an hour. I think they turned out so cute with the pink! Thanks for visiting and have a wonderful Wednesday!

9.29.2009

Go Girl Go!

Supplies : Paper - My Minds Eye, Pebbles Inc, and Scenic Route; Transparency by Making Memories; Glitter Thickers by American Crafts; Flowers by Prima; Big Glazed Brads by Imaginescence; Glazed Brad by Basic Grey; Apronlace edge punch by Fiskars; Sketch by Inspired Blueprints

I played with the #30 Inspired Blueprints sketch with this layout and also the layout I posted yesterday (inspiration for that version came from Designer April Yap's interpretation of the sketch). This one was closer to the original sketch design. I took colors for the layout from the colors on Audrey's shirt. Focusing on the orange and metallic pink I built the layout around those colors and included a transparency (the Practical Scrappers Challenge this week) on my layout, cutting the design by it's curves and using it in place of the patterned paper. Like with pattern paper, try cutting along the design in a transparency to add interest to your layouts. Enjoy the layout and have a terrific Tuesday!


9.28.2009

You Are My Sunshine - Transparency


This week the challenge at Practical Scrappers is how to use transparencies. I think transparencies are so fun but like vellum and other clear paper choices it's often hard for me to think of ways to use them. A transparency gives you the opportunity of having floating patterns, images, and even text on your layouts and cards. Here I used a transparency to substitute pattern paper. It let the base paper show through for a fun addition of pattern without having to add so many colors. This is also great for die cutting like I did here with the sun. Try using white printed transparency patterns for snow or cloud shapes. Layer a pattern transparency over chipboard letters for added contrast.

Don't forget transparency titles or decorative elements like my title here. I like using mine on solid or nonbusy monochromatic prints so that they stand out. They are also great for layering over pictures and many manufacturers have 4x6 transparency lays specificallly made for that purpose. Try using a transparency to accent your title or journaling. Or if you have a printer you can print your journaling right on a blank transparency so that your story floats on the page. I hope some of these ideas spark inspiration on how to use your transparencies. Don't forget to visit the Practical Scrappers Blog for more ideas on how to use transparencies. Have a wonderful Monday!

9.27.2009

Pretty Trees

Supplies : Rustic White Cardstock, Tree Trimming Trio, Signature Christmas, Fancy Flourishes, and Text Style Backgrounds by Papertrey Ink; Juniper, Twilight and Crystal Blue Cardstock, Inks (same plus Sweet Leaf, Cocoa and White) by CTMH; Kraft Cardstock from LSS

Sparkle's Christmas Card Challenge this week had no extra challenge aside from making a Christmas Card and since I just got my Tree Trimming Trio and Signature Christmas set Friday I had to play with them and made 8 total bulk cards. One sheet of Rustic White the pieces cut 4 1/4 x 2 3/4 started the bulk card making (you will get exactly 8 pieces from one 8 1/2 x 11 sheet). I stamped the trees in sweet leaf offsetting them to the right, then the stand, and last the ornaments in the tree blues. After that I lightly distressed the edges in cocoa and set them all aside. The blue cardstock is all scraps from my stash and I cut up enough to make 8 bases. I ended up with 2 Twilight, 2 Crystal blue, and then 4 Juniper. Stamping the flourish first in cocoa I then lightened it up by adding some text background in white. I distressed the base edges in white and set those aside with the trees. Last was the sentiment. I cut one 2 1/4 x 12 strip from a scrap of kraft I had and then cut out 8 of the labels with my nestabilities (it fit 8 just barely so if you do this make sure you're cutting them close together). Instead of stamping the same sentiment on all of them I thought it would be fun to mix it up a little so on 4 I stamped Season's Greetings, 2 Joy to the world and 2 Holiday Greeting to coorispond with the 3 different cardstock bases I had then distressed those in white. Putting them together went by in a jiffy and the total time was about an hour plus the cards are flat, perfect for mailing! Don't forget to stop by Sparkle's Blog for the challenge and her gorgeous Sarah Kay Christmas Card. Have a lovely Sunday!

9.26.2009

Batty

Supplies: Paper - Spooky by My Minds Eye and Eerie by Basic Grey; Diecuts by My Minds Eye; Cardstock from LSS; Spider Brad from Imaginescence; Glitter brads from Doodlebug; Pansy Purple Brad from CTMH; Remarks letter stickers by American Crafts; Bat/Moon Sticker by Pebbles Inc.; White Embroidery Floss (1 Strand)

Here is the other layout I did with die cuts for the Practical Scrappers Blog Hop Challenge only this time I used dies from the preprinted Spooky sheet by My Minds Eye instead of plain ones. I played with another fun sketch from The Scrappiest, this one is sketch #29. Audrey was hilarious the first day I let her wear her costume. She just made the funniest faces I wish I could have caught them all! That Batgirl costume was such a find. Both the girls had been so into superheroes right around Halloween and Caitlyn had already gotten Supergirl but we couldn't seem to find something that really fit Audrey. When we saw the batgirl costume it was perfect. Of course Audrey insisted that she was Batman and not Batgirl no matter what we said. The funniest part was when Caitlyn would kiss little miss 'Batman' for rescuing her! I guess Batman or Batgirl is tougher than Supergirl ^_~. Thanks for stopping by and have a fun Saturday!

9.25.2009

Bat Girl

Supplies : Paper - Basic Grey Eerie, Pebbles Inc.; Transparency by Making Memories; Bat Die Cuts from Pebbles in my Pocket; Glitter Brads by Doodlebug; White Gel Pen; Thickers Letters by American Crafts; Embroidery Floss (1 strand)

Have you heard about the challenge site blog hop? If not hop over to Scrapsketch to start! They are hosting a 'Challenge Site' Blog hop complete with prizes so head on over and see if there is a challenge you want to play in! Here is one of my entries for the Die Cut challenge on Practical Scrappers and for the jazz up your die cut challenge at Just Buggin'. I took plain cardstock bat dies from my LSS and dressed them up just a tiny bit with glitter brads for the eyes and a white gel pen to make the mouth and fangs. The transparency came out looking like vellum in the photo but it's clear in real life. I'm loving the new Eerie papers by Basic Grey. The added plus is they match the My Minds Eye Spooky papers I got last year and never got around to using ^_~ I also used a sketch for this layout from The Scrappiest, a fun sketch site. This layout uses Sketch #20 for inspiration.

You can barely tell, but Audrey is dressed up as batgirl (the layout tomorrow will show her costume better ^_~), and she is also holding a little stuffed bat. Both the girls completely love that thing and named him Squeaky last year because Caitie said that is the sound bats make. I realize now that I didn't put any journaling on this page and I might just add some journal strips later on overlaying the moon so that we have that info about Squeaky written down. If you want to play in the diecut challenge hop on to the Practical Scrappers Blog and link your layout to the Mr. Linky there. Enjoy the layout and have a fabulous Friday!