Showing posts with label Sewing. Show all posts

8.06.2011

Kitty Skirt and Refashioned Shorts


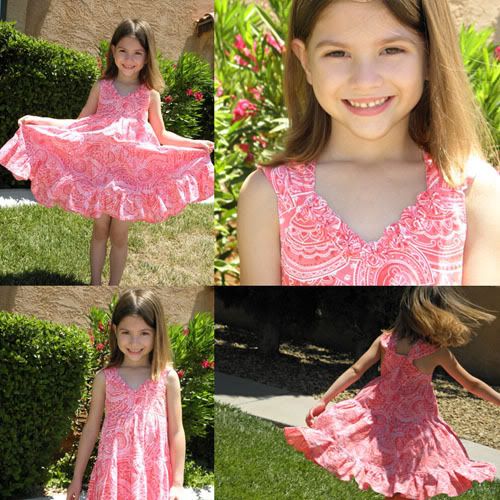
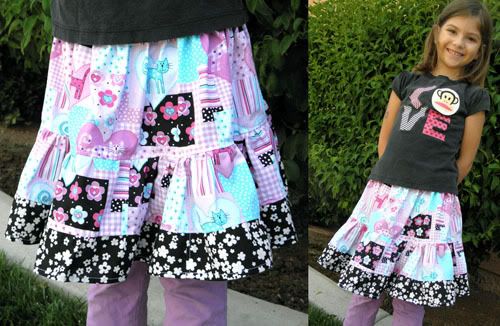
I've been trying to fit in some back-to-school sewing. This was some remnant fabric I picked up from Joann's probably 2-3 years ago. I'm sure I had some idea for a little blankie with it - back then all the fabric I bought was for potential kid's quilts. I also had this black floral fat quarter hanging around, which I probably picked up about the same time as the remnant. They've obviously been sitting around unloved for quite a while and since my girls aren't getting any smaller I thought I should get it used up. I whipped up a simple tiered skirt a la no pattern for Apple since she's our resident cat lover. I'm not crazy about the material, but Apple seems to make anything look cute so it works ;) Besides, she loves the kitties and I suppose that's all that really matters.


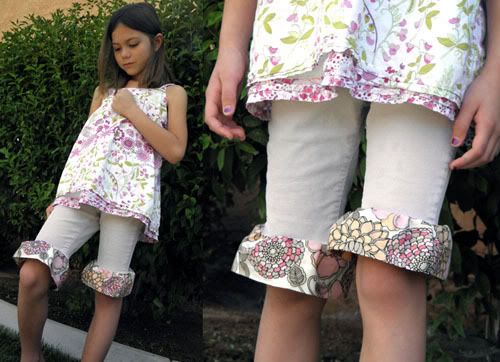
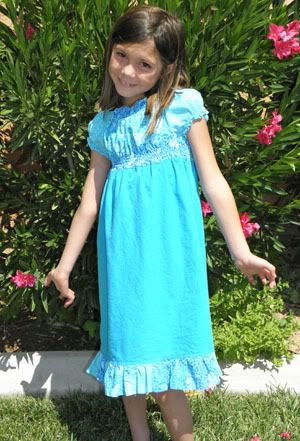
This is a refashion from Cherry's darling cordouroy leggings that she got for Christmas. She's just been so hard on clothes this past year. These were her favorite pants and they had huge gaping holes in the knees since she wore them all the time. Because they taper and are quite snug even on my little string bean daughter, I couldn't cuff them like I wanted to originally. So I found some matching fabric in my stash and proceeded to refashion them into shorts with a cute ruffle. Luckily for me, even though Cherry was upset at losing her pants, she was really happy with the ruffle addition. I'm hoping to make a matching pillowcase tank to go with it using the rest of the fat quarter print and some solid pink that I have onhand. First I have to either buy or learn how to make bias tape though. Anyway, thanks for stopping by ;) Have a wonderful weekend!

7.30.2011

Birdies and Cupcakes Quilt


Like with the Central Park charm pack, I bought this Hoot charm pack it seems forever ago! I had been planning to make a little quilt with it. Since it was my first charm pack, I thought that simply sewing all the squares together would make a big enough kid size quilt. It would make a darling baby quilt, but my girls are bigger now and so I tried to devise a simple pattern that would use just the fabric I had on hand. This is the turn out, with the final measurements at 50x60 ;) The top is actually quilted with blue, pink, and green threads. They aren't super noticable when just looking casually, but up-close it's a fun detail.


I think I love the back more than the front, lol. Even though I really like all the white space on the front of the quilt (plus it may give me the opportunity to embroider a few cute birdies and cupcakes in the corner squares later on), I really love all the bright fun colors and patterns on the back. In fact, these few patterns are some of my favorites that I've been hoarding. The cupcake fabric I bought a few years ago. It was just so cute that I had to get a bit of yardage. I still have nearly a yard in scraps left over even after the 3 aprons and this quilt. The little birds got completely used up in this and I have just enough apple fabric for something small and fun. My SIL saw the back and said it reminded her of one of our local cupcake shops. Their logo is a cute little bird with a cupcake ;) The sweet bit of yellow binding is left over from the aprons. It felt so good to finally use these fabrics up on such a cute project! Now I need to figure out what to make C since this quilt went to little A. Thanks for stopping by and I hope you all have a wonderful weekend!

7.25.2011

Non-Madras Madras Bag


Once I finished making the girls' library tote bags I really wanted to make my own tote bag out of some fabric I bought over a year ago and have just loved simply looking at. After seeing Noodlehead's Madras bag tutorial I figured that it would be perfect for what I was looking for and fit within the amount of fabric I had on hand. I call it my non-madras madras bag. I made the straps long enough to go across the chest for heavy lifting and I can tie them together to make it just the right length for a shoulder tote ;)  Gotta love versatility in your bags! It's been great for the summer and I've used it for everything from pool trips to museum outings to long shopping days and of course library visits. Love it!

7.23.2011

Library Book Bags


The semester is finished, yay! I've got some crafty plans - scrapping our zoo pictures, playing in some card challenges, and of course lots of sewing - and I've got some family plans - days at the pool, picnics and park visits, plus some light hiking. I'm excited for my next couple of weeks off ;) Earlier this year I had picked up a Central Park charm pack by Moda from my favorite quilt shop. I have loved just looking at all these little 5" fabric squares but it was time to use them on something and the girls and I decided that something would be library book bags! I'm simply separated 2 sets of 9 charms for each bag, focusing on a blues and oranges for A's and purples and yellows for C's. I lined the insides with solid fabric I had on hand (A's is pale blue, C's is deep purple) then used some fat quarters for the straps. I also added some interfacing to make the totes a bit more sturdy. The girls and I love how they turned out!


At the beginning of June the weekly reading activity started at the library. The goal is to read 10 books a week (for the younger kids). Being that we usually check out anywhere from 12-18 books and I end up carrying about 9-15 of those, I thought some cute book bags would help encourage my little readers to help carry at least a few more of their chosen stories. Though I'm just getting to post the bags now, they've been well loved the past couple months and I'm glad to say that the plan worked out great! Now each of them can carry at least 5 books. Anyway, thanks for popping by to see what we've been up to and have a spectacular Saturday!

7.21.2011

Summer Tier Dress and Leftovers Skirt


I promised A I'd make her a dress this summer. So I picked up some fabric on sale at Joann's (2 yards for $7) and went to work. I used another of Sandi's patterns, this one is the Gracie pattern that includes a Jumper, Tiered Dress, Tiered Top, and Tiered Skirt. Some people are probably talented enough to make these without a pattern, but I really need the extra guidance, instructions, and pattern pieces. Being the wimpy seamstress that I am, I still haven't gotten up the courage to figure out the button hole settings on my machine so instead of fussing with that I made the tiered top v-neck bodice piece for the tiered dress instead of the original yoke version. Audrey loves it ;)


I had a little bit of extra fabric so I made a simple elastic waistband skirt with a white ruffle for C. I was a least brave enough to do this one without a pattern, lol. I've read, saved, and ogled enough tutorials on simple elastic waist skirts and shorts that even though I was petrified to not have a pattern walking me step-by-step through the process, I was able pull this together. Now that I have the photos uploaded together, the colors look different. That's what I get for taking pics of A's dress in the afternoon one day and C's early one morning, lol. Anyway, $7 for a darling dress and skirt isn't too bad ;) Enjoy and thanks for stopping by!

7.18.2011

The Blue Remnant Dress


I made this dress a few months ago, about a week after making the butterfly blouse. The dress uses the same pattern and uses all remnant fabrics I picked up from Joann's. Awesome, right? I mean who gets a darling boutique blouse and a cute peasant dress for less than $10? I'm glowing with frugal momma pride right now, lol. Anyways, I hadn't set aside a morning to take photos before school started again so I ended up doing a lot of catch-up shots this last weekend since I've sewn a few other pieces of clothing for the girls since then as well. The peasant dress and blouse that I made come from Sandi Henderson's "Claire" Portobello Pixie Pattern. Right now here patterns page on her site is down due to maintenence, so I don't have a link to it. Claire comes with 4 designs - the Round Neck Apron Dress, Petal Knot Dress, Peasant Dress and Peasant Blouse. The Peasant Dress and Blouse are the ones I've made so far.


C has worn this dress more than a dozen times since I've made it. In fact, it's one of her go-to dresses and she wears it practically the moment it gets out of the dryer, lol. I'm glad she loves the clothes I make her so much. The one thing that makes me sad is that after size 8 I don't have anymore patterns for clothing that will fit her. Anyway, I hope you enjoy and thanks for popping on by!

7.05.2011

Scrappy Art Garland


Despite the lack of posts these past summer months, I have been getting a little crafting time in. Mostly sewing. This weekend I had a little time to take pictures and type up a few posts. These are a few quickie photos of the art garland I made for the girls' room. They have been wanting someplace other than just the fridge door to display their art projects (especially the funny shaped stuff), so I thought I'd pick up some clothespins from the dollar store and find some string or something to hang them up laundry line style. But I had a hard time finding thick enough string that wasn't ugly, lol.


So this last week I came across this tutorial for a storage softie garland linked via One Pretty Thing and adapted it to an art garland. The main differences are that I cut my strips 2" wide by however long my scrap was and I sewed up the strips right sides together and pressed them open for a more polished look. When braiding I simply twisted the fabric so that the zigzag seem was hidden in the back. So cute!! I love how they turned out and it was the perfect project to really whittle down my fabric scraps pile! The purple/pink one is C's since purple is her favorite color and the blue/orange one is A's since blue is her favorite color now. I let them each paint their own set of clothespins as well. They love that they have a special place to hang their art and I love that it looks way cute in their room! Enjoy and I hope everyone had a happy 4th!

3.07.2011

Woodland Delight Dresses


I heart this fabric so much and I'm so glad I've been able to get 2 full dresses out my scant purchase of it, lol. A couple weekends back, right before the kiddos got sick with RSV I made a couple dresses for C using the peasant dress option from the Claire pattern by Portabellopixie. Sandi doesn't seem to have any in the shop right now and even though she sells them online, I got mine from a local quilt shop during the summer. It's a great pattern and I've had fun with the peasant shirt and dress options so far. I haven't gotten pictures of the first dress yet even though she's already worn it about 4-5 times since I put it together ;) But here's the second one I made, using some of the leftover fabrics from A's dress last summer.


I sized up to an 8 with the dress, just like with the shirt pattern so that C can wear it a bit longer. While the first dress shirred great I was actually worried with this one since the fabrics are higher quality and so they are a bit thicker. I wasn't sure how it would shirr and after ironing, it seemed the dress would be too big. But a toss in the wash shrunk the shirring down a lot more than my simple blasts of steam and I'm happy to say C can wear it and has worn it plenty since it's been made!


Here are the girls together, both of them in their woodland delight dresses. I still have a little of this fabric left over ;) I'm looking forward to figuring out if I can get another full shirt or skirt out of what I've got left. Paul is all excited for Dragon Age II, which has it's midnight releasing tonight. He and Mark will be going to pick it up at midnight since we'll be leaving bright and early tomorrow morning for the drive up to SLC for the surgery. Of course being a guy his priority is making sure he gets his game before we have to leave, even if he doesn't get to play it right away, lol. I have to admit as his gaming-nerd wife that I'm excited too, but I'm trying to ignore it since I don't really have time to play with all the homework I've been bringing home lately. Anyway, I hope you enjoy this peek at C's newest spring dress and have a wonderful week!

2.13.2011

Pretty Spring Top


My first sewn top! C has been growing out of her clothes like crazy and it seems a lot of the stores around here just don't have that many cute tops in right now, probably because we're still a little in-between seasons. Not quite spring, not really winter anymore (at least not here). We've gotten a couple of darling tees for her, but as for pretty blouses, we haven't found many that she really loves. This last month I picked up a few remnants at Joann's for less than $10 total. I not only cut out enough fabric for a dress (which I haven't sewn together yet), but also enough for this cute tunic!


I used the peasant top variation in the Portabellopixie pattern "Claire", which actually uses up quite a bit of fabric. Because my last size up with her patterns worked so well I did it again here, using a size 8 for C even though she's a size 7. This way she can wear it next spring as well.... hopefully, lol. She's the one who spotted the fabric while we were perusing the bin, and I love these shades of blue! Luckily there was this cute mini flower print and a blue matching solid as well that I snagged at the same time. Someone's must be making a darling project and I just happened to benefit from the end of bolt scraps!


Since the back looks very much like the front, I used a pretty ribbon for the inside tag and wrote the size and my initials beneath so C could easily tell which side was front and back, and so later with hand-me-downs we have the size number for reference. Both C and I were so excited when the top was finished. This was my first time shirring so I was a bit nervous, but it turned out to be so easy and fun! I definitely looking forward to seeing how her dress will turn out ;) Enjoy and have a lovely Sunday!

1.25.2011

A Camera Strap Cover


My SIL came over this weekend and wanted me to test out her new sewing machine, so I made a quick little camera strap cover with the scraps I had from A's dress that I made in the summer. Next time I'll try for a wider one, since it was a pain to get this one turned right side out, lol. But it turned out cute so I won't complain too much ;) She's already made good use of my test run, as she called me to troubleshoot a couple things on Sunday. Sounds like she's already putting it to good use! Anyway, just thought I'd share real quick what I did craft wise over the weekend, since I didn't have time to post it then. I spent the rest of the weekend with homework, 2 take-home tests (which unfortunately for me aren't as easy as they sound), and I finished 3 of my 5 panels for a 2D design project I'm working on. Hopefully I'll have time during the week to play in a challenge or two, but for now I hope you enjoy my little project and have a wonderful week!

1.17.2011

Modern Patchwork Razzelberry Apron


I'm gonna shock you with some actual pictures of me, lol. After making aprons for the girls, for gifts, for my mom and my MIL, I've finally made one just for me ;) I've been eyeing the fun aprons at Pier 1 for more than a year now but haven't wanted to fork out the $20 for something that is more frivolous than practical, at least in my mind. When Kelly started posting tutorials this month for a bunch of different knock-off aprons, I knew I would end up having to try my hand at sewing one of them up! So this past holiday weekend I used her Razzelberry tutorial to make my apron. It has the halter top style like the aprons I had been looking at. Then I improvised with a modern patchy look, both for fun and out of necessity (most of the fabrics I used are scraps from other projects). I love how it turned out!


A was taking the pictures and wanted me to do a 'dance' pose. Instead I just tried to do a cute mini jump though I'm not sure if it turned out very cute at all, lol. You can't tell from the pictures but all the ties are white, as is the lining, and then the white ruffle at the bottom just pulls it all together. I did have to make some adjustments to the pattern in the tutorial, since I'm a bit top-heavy. I just added an extra inch to the bottom of the halter pieces and then a half inch on each side for more coverage. Since I actually sew with 1/2" seams it simply made the finished halter pieces about the same size as the pattern. Anyway, Kelly had a few tutorials on different types of aprons like the Charlie Brown Apron, the Sail-Away Apron, and the Sandalwood Apron, all of them were part of her Be a Cutie in the Kitchen - Apron Week. If you've got the sewing bug, I recommend heading on over to her blog and picking your favorite style of apron to whip up! Enjoy and thanks for stopping by! Have a fabulous Monday!

1.15.2011

Felt Food and Pink Milk Repurposed


Today has been a lazy kind of day. I wanted to really get some hefty craft time in this weekend, maybe make one of the cute aprons that Kelly from Sewing in No Mans Land has been making tutorials for this past month like the Razzelberry or Sail Away apron. But today I ended up with a huge lack of motivation to actually do anything. After the girls lunch, I realized the pink milk (Strawberry Quik) jar was empty. It seemed too wasteful to just throw away, so I decided to cover it up with some Adobe papers from American Crafts ;) Then my mojo started to sputter back to life and I figured since I have this cute box now, I should make something to fill it with. I've been eyeing all the felt foodies online, planning to make some for the girls, but my hand sewing skills are pretty atrocious. Even so, I figured I could give some felt cookies a shot and I ended up making a full dozen! They are so addicting and a lot of fun. Plus, all I used for these guys were scraps. I'm excited to try making more felt food. I think next up is donuts, lol!

12.30.2010

Organized Art Totes, an Owl, and B-Day Gifts


While in my crazy late-night-trying-to-be-sneaky sewing rush to make the last few Christmas presents, I didn't get pictures of a couple of the fun goodies I made for the girls this holiday - Organized Art Totes. They completely got me in the mood for my New Year's purge and organizing marathon ;) You know how much I love organizational goodies! This one is A's.


Here's the inside. I found working with crayons harder to design than pencils, but I think her tote came out alright. Because it was the first one I've ever made and I didn't have a pattern, there were a lot of mistakes, but of course she didn't notice one bit ;)


You can tell C's is more refined. A lot of my first time mistakes were remedied this time around and well, the pencils were much easier to design for. I love how professional looking hers turned out.


Of course I did still make a small boo-boo with hers as well - the books are a tight fit. They still slide in and out alright, but it is pretty snug. A half inch more would have been better. Other than that I only wished I put a big pocket on the outside of them both. They love them so much and carry them everywhere that it would have been nice to have an extra pocket for their dolls or special toys to take too ;)


One of my favorite parts about these aside from the darling remnant fabrics the girls picked out, was my double stacked PTI buttons. They turned out so well I know I'll be using this on other projects! Overall I'm very happy with how both totes ended up turning out and even more so with the reception they got from the girls Christmas morning!


This little guy was one of A's Christmas prezzies. She loves owls and I bought the Hoot & Annie pattern back in the spring. I've been wanting to use it and thought now would be the perfect time to stitch it up! I think I'll be making more of these in the future, they are so easy to put together and are perfect for using up scraps!


Next up is C's momma snake that I made for her birthday earlier this month ;) C is so into snakes, she just got another snake book this Christmas, this time it's one of those National Geographic ones with all the fun facts. She loves talking about all the cool stuff snakes can do!


Momma snake is even taller than C!! C loves her big snake so much, it makes me so happy to see her play with it and cuddle it so often along with her lovie snake that she's had since she was a baby. The lovie has now been deemed 'baby snake'. So cute!


And last up is A's mermaid doll that I put together a couple months ago for her b-day. Her entire birthday was mermaid themed as she absolutely loves mermaid everything right now! I didn't have a pattern so she was very trial and error with the tail and swimsuit. I think she turned out darling though!


A's b-day just so happened to be right around mid-terms so I didn't take the time to snap shots of her mermaid doll until now. Of course A had to name her Ariel ;) Now that I have the Wee Wonderfuls book I have a lot more fun dolls to try making as well as a mini-mermaid! Anyway, just thought I'd share these fun sewn goodies while I've got the time ;) Thanks for stopping by!

12.24.2010

Snuggly Owls


The girls are so excited for Christmas. I was going to make them wait to play with these until Christmas morning but it's hard to be sneaky when they know I'm sewing stuff up. These darling owls were made from this Snuggly Owls tutorial created by Ashley from Make-It and Love-It. So fun and easy! I made my owls all with fleece I had on hand, their fluffy front feathers are inspired by Target's Circo owl pillow. They have so much fun texture!


To make the front loops as well as the wing strip texture, I cut strips of fleece 3/4" wide. Since fleece doesn't fray there's no need to finish any edges. With the loops I simply pinned up each row of loops then sewed them down. The wing strips are really simple, just line them up straight, pin, and sew a line down the center. I added my textures before sewing the pieces onto the owl. Enjoy and I hope you're all having a Happy Christmas Eve!

12.17.2010

Easy Fringe Fleece Scarves


Aren't these just so cute! I've had a stash of fleece remnants hanging out in one of my fabric bins for a while, so I thought it would be fun to see what kind of tutorials are out there for fleecey scarves. This Easy Fringe Fleece Scarf tutorial caught our eyes and I knew immediately that we needed to try it out. The girls picked their colors from the stuff I had on hand, which was super fun for them. Then they watched me whip them up!


I ended up making theirs 6" wide by about 45" long. I just cut selvage to selvage and then trimmed the selvages off. Right sides facing out (note that most fleece doesn't really have a 'right' side - mine had a fluffier and flatter side, so I used the fluffier side as the right side), sew a seam down the long side middle to hold your two or three colors of fleece then cut strips all the way down one side of the seam taking care not to cut through the seam itself. I gave myself a good inch away from the seam. Repeat on other side of the seam. Shake up your scarf, both to mix the fringes as well as shake off the extra fleece fluff ;) The fleece won't fray and these are super quick and easy to make! It took less than 30 minutes to whip them both up! These would make great handmade Christmas gifts for the little girls as well! If fringe isn't your style Grosgrain and One Pretty Thing have a wonderful list of different style scarves to DIY. I hope you're all warm and cozy this winter ;) Thanks for stopping by!

11.24.2010

Frugal Christmas : Crayon Holders


My first Frugal Christmas gifts were for adults, but we also drew a niece and nephew as well for our family's get together. I usually keep some coloring books on hand for our girls and last year we ended up with a lot of extra coloring books, which is perfect for some frugal giving. I had also bought quite a few boxes of crayons with the 2009 back to school sale - 20 cents a box! While a box of crayons and a couple books would probably be fine, it's much more fun to have something to put your crayons in! So here's my second Frugal Christmas project - crayon rolls. The particular tutorial I used was one I downloaded a long while ago and can't seem to find the original post, but Fiskars has a darling simple roll tutorial designed by Susan Weinroth, and Skip to My Lou has a fun ric rac version as well if you want to make your own ;) Since I didn't have extra batting hanging around I used some extra fleece scraps I had in lieu of batting, it worked great!

Here's the inside of the roll. These are so cute and fun, the girls have been begging me to make them some too, so you can probably bet that I'll be making some for them as stocking stuffers ;) We'll be heading to my SIL's tomorrow for a Thanksgiving BBQ and then Saturday we'll have a traditional thanksgiving at my MIL's. Friday will be our usual Christmas decorating fiasco! Anyway, thanks for stopping by and I hope you all have a fabulous Thanksgiving!

11.21.2010

Frugal Christmas : Rice Hot/Cold Packs


Thanksgiving is nearly here which means Christmas isn't far off. For us, buying thoughtful gifts just isn't feasible this year and with me in school I need projects that are quick to make! One of my gifting projects is rice heat packs. Not long ago, Paul hurt his back pretty badly. Long story short, I made him a rice heat pack and he loved it! That little pack helped his back so much during the day when he couldn't be on the muscle relaxants, and even now it helps with minor aches and pains or if my feet are really cold ;) We drew Nana and Paul's brother for Christmas this year (our family draws names for Christmas instead of everyone trying to gift everyone) and neither of them have a handy little heat pack, so these are going to be our gifts to them. I adapted the pattern in One Yard Wonders for the obi-inspired heat pack and simply took the heat pack part and the pocket and to make these. Total time - about 45 minutes for one (I'm a slow seamstress). If you want to try the same type of thing but don't have the book, Sew Mama Sew has a great tutorial for a darling set of heat pack goodies! It's a little more complicated, but super cute if you have the time. For a really quick heat pack Real Housewife has a longer wrap around rice heat pack that is amazingly easy to whip up! The best part, all these were made with stuff I had on hand! How's that for being frugal ;)

And this here is my little draft snake that I whipped together using Simple Sewing's easy peasy instructions. I sew on my dining table, sitting close to the window. It's been windy and rainy here and I noticed a chill draft cutting in while I was making the heat packs so using some scraps I had sitting out I made this little guy quick! These are so simple to make, cut your fabric 7" tall by how wide you want, or use scraps to get the width. Right sides together sew one short end and then the long end. Turn right side out and fill with rice or dried beans. Fold under the open short end and sew closed. Viola! No more drafts ;)

9.04.2010

Lantern Bloom Quilt


Less than a week before classes started I went a bit crazy and decided to make my lap quilt from the lantern bloom fabrics I had bought in the spring. I had finished everything but hand sewing the back of the binding when classes started and I wrapped that up over the first couple of nights of school. I'm so happy it's done and it has already been hard at work keeping me nice and toasty (yes I know it's summer but Paul has to keep the thermostat low because of his MS so it's always freezing in our place). These blocks were new for me, I hadn't ever pieced like that before. It was fun and actually went much quicker than I thought it would. My quilt was also quite a bit more scrappy than I thought I would be making. I didn't have enough of the patterns to make the whole thing so I ended up using whatever solids I had onhand that coordinated.


Here's the back. I'm so happy I opted to do a square with square border rather than the strips I had planned to at first. I think it goes better with the quilt to have the square theme on both sides! This is my last future post so I might be MIA for a while until there's a break or vacation, with the exception of Sparkle's weekly stamp challenge. They are my creative break every week! The labor day weekend won't really count for me since I'm hoping to finish up the majority of the work and quizzes for my other online class. If I can squeeze it all in I'll be done with that class as well and be able to take the final on Friday. That will leave me with just 3 classes and the fitness center course for this semester, yay! And in case you were wondering my test outs went great and I ended up with an A ;) I hope you enjoy and have a wonderful weekend!

9.02.2010

Scrap Tote


As I reduced the amount of supplies I took to crops I also started simply using whatever bags I had on hand to carry my scrappy stuff in. And for the past long while I've simply been using my green bags that I use for grocery shopping. They are almost the perfect size and are flexible enough to handle being pretty full, but I've been wanting something specifically for my scrap supplies.


So when I ended up with a bunch of extra fabric after making my yoga bag I put together a scrap tote for myself complete with lots of pockets to store paper, pictures, and other extras like my thickers and tools! The base is more than wide enough to accomodate my Slice as well. Which was perfect since I had finished this just a couple days before that last crop ;) Thanks for stopping by and have a wonderful Thursday!

8.31.2010

Scrappy Mini Gym Bag


All the posts for the past couple weeks and this next week have been future posts except the ones for Sparkle's Stamps challenges since I post those right after I make 'em ;) It's fun to see how productive I was during the summer and makes me feel so accomplished! Today I'll be taking the last of my test out tests, another 2 hours, and then if I passed them all I'll be completely done with that comp lit class for the semester. Yay! Yesterday I took the other 2 one-hour tests so I'm pretty beat but I keep telling myself it will be worth it. Anyway, about the bag - I had some decent sized scraps to work with after making my yoga bag and came up with this little mini bag for my workout clothes and tennies. This was just a couple nights before I started working on Paul's quilt. Since we're a one car family I don't have a vehicle while at the college, and with my fitness class being the last thing on my schedule I really don't want to wear my gym gear all day long so this little bag keeps my tennis shoes from marking up all my books in my backpack. It's also large enough to fit my workout clothes and I sewed a little pocket inside for my ipod and headphones. Handy eh? The best part - it even matches my yoga bag which will be great next semester if I decide to pick up the yoga class ;) Thanks for stopping by and have a terrific Tuesday!