Showing posts with label Misc Art. Show all posts

4.01.2010

Paperscrapsville


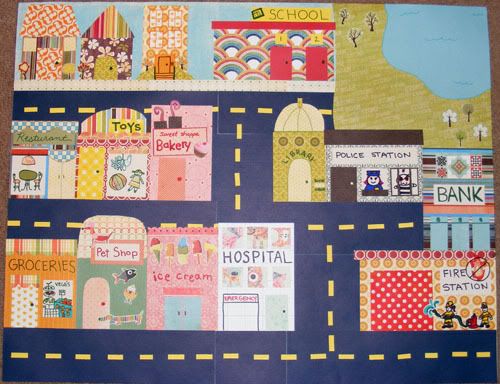
It started out as a speech therapy homework assignment. Then it turned into a sketch. The next day it ended up being an entire papercrafted town! So maybe I went a little crazy with this... maybe ;) Crazy aside though one of my crafting goals this year is to whittle down my scraps and this project used up an enormous amount of them since nearly everything here uses scraps! The homework assignment was fairly simple, to talk about different places in town to help build vocabulary and familiarity. Just a warning this is a long rambly post ;)


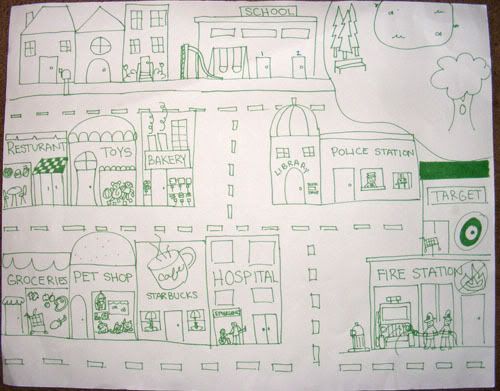
I made this sketch on my dying poster board for the activity, the one I use to back my layouts for pictures. This way it didn't end up in the recycling bin and we could play with the Littlest Pet Shops to work on Audrey's speech therapy questions like "Where should kitty go to buy bread?" "Who is in the grocery store?" "Where is Lizard?" and there would be a good visual to help her. So now homework is more of a game rather than information regurgitation and she loves it, both the therapy game and playing on her own.


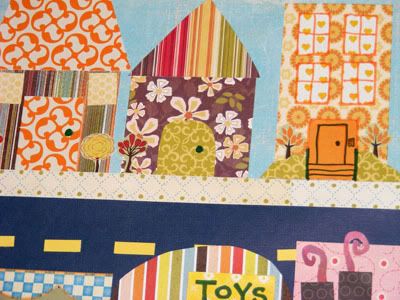
Here are some close ups. The idea to do this initially came because Caitlyn said "Now color it Mom!!" I will admit I am hard pressed to color even a whole page in the coloring book let alone an entire poster board! So the idea of coloring this board was incredibly daunting to me. Even so, looking back coloring probably would have gone faster, lol. But I had a lot more fun this way. And then using up all those scraps... major plus! I didn't glue the buildings down until I was almost done making all of them since I was using my sketch as a reference and it also allowed them to play with the board until I finished.


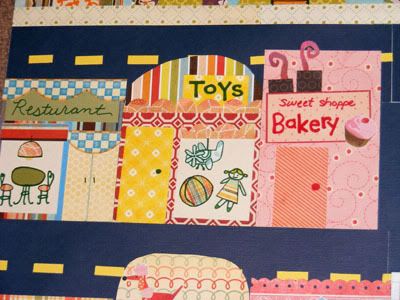
Each building was made separately, doing it in those tiny chunks made the project seem easy and the best part was that I wasn't worried about matching the entire board, just the one building I was working on. Plus perfection wasn't the goal, I hand cut all of the curvy stuff and hand wrote everything, I think it looks more fun and whimsical that way ;) The road was made using 2 full sheets of textured navy cardstock, the sky and park grass each used a sheet of MME paper - all from my to be purged pile so that was another plus too. All the other patterns and cardstock were scraps.


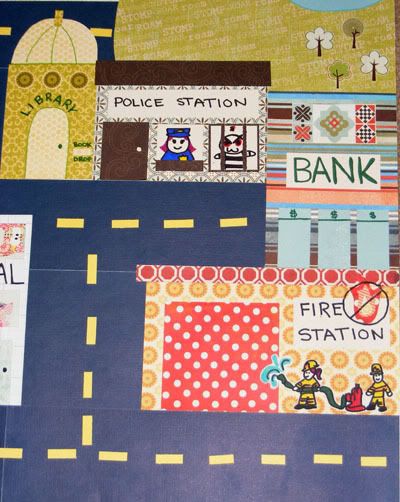
The Police Station is one of my favorites, simply because of the silly little jailed guy. I changed the officer from a guy to a gal after gluing it to the board. The firefighters were requested by both Cait and Audrey since I drew them on the sketch. I was actually planning on not making them since I didn't think I could make them look any sort of decent but they turned out alright. We've decided the little guy is in jail because he tried to rob the bank.


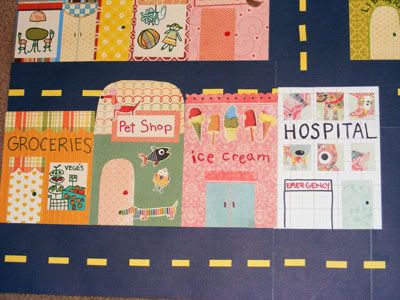
Some stores changed between the sketch and finished project, namely the coffee shop and Target. While putting together buildings I realized we didn't have a bank and also that an ice cream shop suited a kiddo project better than a coffee shop since I won't let them try more than a teensy sip, lol. Anyway, that was my creation from homework assignment to massive play project ;) The even crazier part is now I'm thinking of other places to make like the zoo, the inside of a house, the school, camping grounds, etc. I still have a lot of scraps left...

1.05.2010

Pretty Prima Tin

Supplies : Marrakech paper by Basic Grey; Buttons by My Minds Eye; Flowers by Prima; Ribbon in Ocean Tides and Jute by Papertrey Ink; Repurposed Calypso Prima Tin

The Practical Scrappers challenge this week is to use up buttons! I have so many buttons and I love using them on EVERYTHING! It seems like I'm always sticking a button on something here or there, but for the challenge this week I really wanted to make something that uses more buttons than my usual. This darling Calypso Prima tin that I had hanging about was just waiting to be altered! I picked out the buttons first and decorated the top then found some paper to match. Thinking back I probably should have picked the paper first, but everything worked out ;) Doesn't it make such a pretty little jewelry tin! Or for a crafter I think it would be darling holding prestamped images, flowers, or a kit! I stuck my current watch in there for the picture, I love how the turquoise looks against that paper. I'm so addicted to these watch bands and am always excited to see the news ones at our Pebbles store. Anyway, enjoy and have a great Tuesday!

12.17.2009

Mini Paper Stockings


Supplies : Paper by Basic Grey; Buttons and Twine by Papertrey Ink; Thickers Letter Stickers by American Crafts; Ornament Stickers by Crate Paper; Bird Tag Sticker by Cosmo Cricket; White Velour Ricrac by May Arts; Brown Gingham Ribbon by CTMH; Pink Gingham Ribbon by Pebbles Inc.

This week on Practical Scrappers the designers were challenged to make paper crafted decor items. I love stockings but have yet to buy or make some for our family. I think I must be too picky because I never see any premade ones at the stores that I really like. So for now I used some of that darling Eskimo Kisses paper to create these mini 4" x 8" paper stockings, perfect for slipping in a few holiday treats, pencils, bookmarks, etc. I could totally go for these patterns in fabric ;) To make them was quite simple I drew a stocking shape and then cut out 2 pieces for each. Then I paper pieced the soles and cuff of the sock before sewing the whole thing together. I picked a different set of Thickers for each of our names and then embellished the stockings with stickers, ribbon, and buttons.


I wanted to keep Paul's stocking a bit more maculine so I stuck with the deeper reds and the green, both favorite colors of his. Instead of adding ribbon I used the twine to string the buttons together. I love the rustic look it gave his stocking. The dot paper is actually one of my last sheets of Figgy Pudding paper and it coordinated quite well with the new set. For my stocking I picked my favorite patterns then added just a trim of the ricrac and some buttons to finish it off. The velour ricrac is so fun and fuzzy, when I actually get around to making or altering some fabric stockings I'll have to find more of this stuff ;)


With the girls stockings I used some of the pinker patterns, especially on Audrey's and of course I had to use some glitter Thickers. I had actually tried putting Caitlyn's name across the cuff but it didn't fit and when I moved the letters some of the paper ripped. So to fix my mistake I added some of these fun stickers. And after adding stickers on Cait's I couldn't not put a little sticker on Audrey's. This little bird tag fit her so perfectly. Enjoy the stockings and stop by Practical Scrappers to see the other decor items! Have a terrific Thursday!

10.17.2009

Halloween Banners


Supplies : Paper by My Minds Eye and Pebbles Inc.; Ribbon by Pebbles Inc.; Cardstock scraps - LSS and CTMH; Die cut Patterns from Spellbound - Slice

This was such a fun project! I had seen these pennant banners here and there and since Halloween has become a rather large holiday for us I figured it would be fun to try out making one. The instructions are at Splitcoast but for a quick overview you will need a 12x12 sheet of paper for every 6 triangles you want to make. Cut your 12x12 sheet in half so that you have two 6 x 12 pieces. Across the top of each piece use a ruler to make a mark at 1", 6", and 11". Then across the botton of each piece mark it at 3 1/2" and 8 1/2". Draw a line to connect or do like I did and just line up the diagonal marks and cut. I trimmed my pennants with edging scraps cut with my mini scallops and pinking deco scissors. I then cut the 2 1/2" letters with my Slice from various scratch papers and then did the same with the fun pumpkin, date, and bat elements. Using my 1/8" hole punch I punched two holes in each top corner and thread a long bit of hemp to hold the banner together, then tied loops for hanging at the ends. Buttons on the pumpkins and some ribbon finish it off. Because I didn't have any single pattern of ribbon long enough for the entire banner I used 4 different patterns trimmed to size which did double duty as embellishment and hiding the punched holes and strung hemp. This was such an easy and fun project to make!


Here are a couple closeups of the pumpkin ends on the large banner.


This is a smaller banner I made using other My Minds Eye papers. I had acquired quite a stash of Halloween papers and many of them I realized I probably won't get around to using on pages. I've been trying to use things up as I buy them and use up my stash as well since it's getting larger than I like. These pennant banners were a great solution and I ended up using 6 full 12x12 sheets and many scraps.


Another closeup, this one of the bats by the moon. I really like the simple shape silhouettes offered by the Slice. I use it mainly for alphas but I'm finding the images are really fun too! Enjoy and I hope you all have a wonderful weekend!

8.06.2009

Cromartie and the Dolls

Sounds like a band! Meet Cromartie. Cromartie is my silly little voodoo pin cushion. Even though I'm an amateur, I was determined to sew a fun pin cushion for myself since I didn't have one and those simple tomatoes don't offer much in the way of inspiration. Cromartie took me way too many hours for how simple he was and I won't even show you my other failed attempts. Long story short my papercrafting and sketch skills were not enough to transcend the 2D to 3D barrier. He's much different than the doll I sketched, but in some ways he turned out even better - like the way he sits up which wouldn't have happened with the limbs I drew in his preliminary design. And I have used him a lot the past couple days as I made dolls for my girls. It's been weird to sew instead of papercraft this week!


Here are the girls' dolls together. Normally I only sew flat things - baby blankets, simple square tied quilts, pillow cases - easy stuff. But after seeing some cute dolls on Etsy and The Black Apple I thought maybe... maybe I could make something like those. I did a lot of watching youtube doll sewing tutorials and searching Etsy for more examples. You can buy patterns but I didn't want to spend that much money on someone else's pattern if I could come up with my own, especially when they seemed simple. Some of the dolls and patterns seem pricey but after creating my own I can understand why. Just making the doll pattern took me about 4 hours (with interruptions). I sketched everything first then went over with my sharpie to emphasize the correct lines before cutting out the pattern pieces.


Cromartie was so instrumental in teaching me how to sew a stuffed piece while I made him. All the strife I had creating him made putting together the dolls so much easier. Plus he's a lot smaller and I've discovered it's easier to sew a bigger doll like these than a small one like Cromartie. This doll is Audrey's. She picked out light pink hair. The hair and shoes are felt and the rest is quilting fabric. Remnants and fat quarters are my new shopping favs. Some papercrafting supplies made it onto her as well with My Minds Eye buttons embellishing her shoes and some grosgrain I had in my stash for hair bows. I know, technically those were sewing items before they were ever papercrafting ^_~


Caitie's doll is wearing her favorite color - purple. She picked out hot pink for the hair so I decided to give her rocker girl type colors with the black tights and purple shoes. This doll's hair was much easier to sew than Audrey's and I'm thinking the next time I just won't stuff the buns. I drew their faces on with a fabric marker - way easier and quicker than embroidering which was what I had originally planned. Now the best part is that they LOVE these dolls! They have never shown the interest or love in the store bought dolls as they have with these and it makes me even more proud of them because the girls cherish them so much :D Anyway, it looks like this became a triple doll Thursday instead of a triple card. I hope you enjoyed the change in crafts and have a terrific Thursday!

6.26.2009

Singing Monsters

My mom sent some fun stuff this last month, one thing in particular that the girls really loved was the package of modeling magic by crayola. Before I knew it I was making these cute little guys for them while they made everything from snakes to aliens to balls and fruit, lol. We were using the plain white so after they dried we colored them in with their crayola markers. They did the initial coloring and then after Cait saw me helping Audrey fill in the gaps she decided that I needed to color hers for her too, lol. The orange monster was pretty quick, but Cait wanted 3 layers of blue on hers before she thought it was good enough to be done! I used my CTMH markers just to fill in some of the joint gaps and then sharpies for the mouth, eyes, and the final coat of blue on Cait's monster. Before the modge podge the orange monster had deep pink spikes and the blue monster had purple spikes, but as we were putting it on the colors started to bleed into each other making them a bit more red and closer to blue on the other. Not that the girls minded the next day, all they cared about was that the monsters were dry and they could play with them.

Here are some close ups of the monsters if you click on the pictures. They are actually pretty small, a little less than half the size of a my little pony. The modge podge really glues the joints tight together. I took inspiration for their faces from the Eek! A Monster stamp set (the mini monster) by My Cute Stamps. I've been oogling this darling set not just for little boy cards but for my girls as well since they like monsters (at least cute ones anyway ^_~). It cost us nothing to make these since all the stuff we had on hand and my mom sent the modeling foam and we got two days of creative fun making them, plus all the time they've been playing with them this past week which is a lot! Anyway enjoy these little critters and have a good day!

12.01.2008

Color Challenge #41

Wow, it is already December! I wanted to do a color combo that felt cozy and I wanted to use Sorbet. It's one of my favorite colors and I have yet to really utilize it. To play use at least 3 of the colors and send me a link to your artwork so I can post it here. Have fun with the combo!

Sorbet
Crystal Blue
Twilight
Creme Brulee
Supplies: Gratitude, Spot on Backgrounds, and Cottage Floral Stamp Sets, Chipboard Letters, Sorbet Ribbon, Fresh Cuts Chipboard, Twilight brads, and Cardstock all by CTMH; Big Brads by American Crafts; H and E Chipboard Letters by Rusty Pickle

I wanted to do something other than a card this time around and just wasn't feeling in the mood to make a layout. I don't often make fun things like this but I thought, why not? lol The blues and yellow match my MILs furnishings so this will probably be gifted to her ^_~ I want to make one for me now though, hehehe. The squares are simple 4x4. This was actually really easy to make and was inspired by the big hanging in the fall keynotes. Here are some close ups to show more detail:

It's got a bit of dimension:
Even though the crystal blue came out funny in this picture (my lighting in that corner is not too good), this picture really shows the fun dimension in this project. It also shows the ribbon's color a little better, it came out super bright with the flash, lol. Anyway, I want to thank all of you that have been playing in the color challenges with me! It keeps me motivated to continue to host them :D Hope you enjoy the colors and have a fantastic Monday!


6.15.2008

Happy Father's Day


I hope everyone is having a great day with their dads and hubbys today ^_~. Here's what we made for Poppa for Father's Day.


I got one of those 12x12 frames with my 40% off coupon at Roberts on Friday. I think I must have been lucky since it was the last one they had. I'm such a procrastinator when it comes to special occassions like this. We had taken the pictures for this Friday morning, I went and got them developed at the one-hour photo and shopped for the stuff to make this that afternoon. Which actually worked out really well since I had the girls still in their outfits to compare to paper. Uses Crate Paper and Bazzil cardstock. I completely lifted this layout from the Reflections book, but made it for a Grandpa instead of a Grandma. I like mine better ^_~. The frame color was choosen because Paul's dad loves blue. The girls actually did quite a bit of the painting. Then I sand distressed the edges and made the page to put inside.


Paul got a few things he's been wanting and I ended up not making a card for him. He says he likes it that way since he already gets so much from me but I have a hard time not making one still. I told him he'd get one out of the blue later ^_~ He's favorite thing was the new pictures of Cait and Audrey for his wallet. Anyway, have a fun Happy Father's Day everyone!!

5.11.2008

Happy Mother's Day!

Happy Mother's Day!!

I tried to go shopping for my Mom and MIL earlier this week for Mother's Day and just couldn't find anything that really popped out at me. Well Friday evening rolls around and suddenly I remember, hey! I've got a life delights showcase set still. Not only that but I had bought one of the 9x9 accordian albums when they were on that special $1 deal. So even though my mom's will be late (since I had to mail it out), I think it will be worth the wait. It's been 2 years since I've done any cute albums for anyone and both my mom and MIL have always loved the mini albums I've made before, so I printed out new pics from my digi camera to put these two together.


This one uses the Life Delights Showcase kit. It was the fastest one to put together since the layouts are all preprinted, all you do is add the stickease, photos, and accessories and viola!


I only had 4 sheets left of the More to Adore paper pack but had a bunch of stickease for the set that Sparkle had RAKed me with. It was perfect for this showcase. The stickease made finishing off this display album quick and easy, the longest part was cutting and gluing the layouts together. I basically followed the same design as the Life Delights showcase, subbing what papers I had to fit the layouts. Both of these came out so wonderful, I'm hoping they really enjoy them!

While I was starting to get together these albums Paul said we should make something for his Grandma. It's been just over a year since Grandpa passed away and she's been feeling down. The last time I had make them an album was right after Audrey had been born. I used twilight B&T and some floral tapestry B&T to supplement. Twilight ribbon rounds, some prima flowers, and CTMH embellies accent the album. The chipboard album itself is from Basic Grey. I wasn't thinking about having to cut out each page to cover the chipboard with and had almost gotten the scallop one. I am SO glad I ended up getting this bracket one instead, lol. So that's what I've been up to these last few days. I did break down and print 100 new pics of the 500+ that I had on my card so I'll be scrapping a few of those soon. Then I really need to get back to doing the 2006 seeing as it was my goal to get them all scrapped by the end of June and I still have more 2006 pics left than 2007 ones, lol.

And talk about a nutty way to start my mother's day. Audrey completely mutilated my glasses this morning (luckily I had one last pair of contacts that I hadn't opened yet), and Paul informed me last night that nothing had been fixed on the car yet and our rental was only covered until Sunday... so today basically. The reason : insurance never gave the okay to the mechanics to start working on it after they did the estimate. They never even got back to Paul after he left a message to see what's going on. Enterprise says it's alright though, that anything we end up having to pay to them because our car is still in the shop we can claim through our insurance to be reinbursed, that is if they don't just pick up the bill which they might do come Monday when we can get things straightened out. Paul's taking care of the whole thing to which I am SO thankful because I'd have a fit and not even know where to start. We still have to take the car to the body shop after the mechanics replace the radiator and fix whatever else there was so that means our car probably won't be ready until the end of next week, if there are no more hiccups. And Caitie has had hives since we got home from the movie yesterday. Paul's mom and sis were watching the girls and none of us have any idea what caused them. She hasn't had anything she's allergic to as far as I know and they are really only on her legs. Apparently they had gone down by the time we got home from the show, but she still had them this morning, so yeah my morning has been a bit crazy.

Then my mom called around eleven and we talked. I was so surprised because she usually treats me kind of indifferently, ever since I was a teen that's kind of the attitude I felt I got from her. I know she cares, but she's never really been there for me emotionally. When things go wrong it's usually a 'you made that choice' or 'I didn't agree and you did it anyway, so now look what happened' kind of thing. Well, this time.... she comforted me. She told me everything was going to be okay and things would work out. She reminded me to remember all I do have, my hubby, my girls, and how much they love me, how much she loves me. She actually talked to me and she's never really done that before. I was dumbstruck for a while to finally get that mothering from her that I missed. I've constantly envied Paul's sisters for all the support they get from his mom, and it helped so much with everything that has been happening that I suddenly had a mom of my own when I've felt for so many years that I really didn't and I just cried. I cried about everything that's going on, about finally getting that emotional support from my mom that I didn't have before and didn't realize I had needed so much, about all the stuff that's happened really. Anyway, there's my drama for the morning. I'm doing quite well now, nothing like a good cry, some check balancing, and major cleaning after all that to clear my head, lol. I know it's Mother's Day and I'm not supposed to do that stuff, but the crying helped in just letting out all that tension and doing a little math like that and working with my hands really helps me get over stuff. Well the math just because it gets my mind off stuff and my controlling nature is much more settled when I know exactly where we are at financially. Anyhoo, I'm totally just rambling now. I hope every has a wonderful Mother's Day whether you're a mom or not ^_~

2.07.2008

Yertle and Nick's Book


Colors : Clover Meadow, Key Lime, Buttercup, Dutch Blue

Papers : Carnival B&T (retired), CTMH CS

Stamps : Yertle (stamping bella), Sans Alpha

Accents : Green Staples

Made this for the SCS sketch challenge 162. I've been wanting to play with my Yertle ^_~ He's such a cutie! I also got my stapler out since I haven't used it in forevah! And I think I've been having something for green lately.


Nick's Book :


Papers : Expedition, Textured CS (CTMH)

Stamps : In the Wild, Sans Alpha

Accents : Waxy Flax, Buttons, Dimensional Elements Alpha


I made this from a regular sized file folder. I was trying to think of something to do with them since I have this stack that's just taking up space lol. I think this is what I'm going to make for family for Christmas this year. One for each of the kids and a family brag book for the parents and Nana & Poppa. Yes, I'm starting now. If I don't I'll never be done in time lol. The year before last I made my nieces and nephews kid sized quilts. I started that one in Jan and didn't finish until October! I had wanted to finish this today but it looks like I'm am going to have to order prints because both printers are being poopers :P On another note I glued all the paper to the book before thinking so I didn't get to embellish the front like I wanted. I'll just have to remember to make the cover first so I can cover up the back of the embellies with the paper with the rest of them. This one is the first so I've just been trying to figure it out as I go lol.

2.02.2008

Mini Farm Book


Colors : Star Spangled Blue, Orange, Sweet Leaf (BCC13)

Stamps : Veggiebella (stamping bella), Doodle Alpha, Sans Alpha, Charmed Lowercase, Punny Farm (MFT), Sketchin' Caps

Accents : Orange Waxy Flax to hold the book together

When I read the Bella color challenge for this week I immediately thought of veggiebella. So I went to work mounting my new bellas on EZ Mount then decided instead of a card I'd make a cute little book and use the Punny Farm animals. Caitie loves my bellas and she loves the new Punny Farm stamps I got as well. So I made her a little something cute! I'm hoping she likes it :D

Here are the inside pages :

12.21.2007

Card or Candy


Colors : Baby Pink, Blush, Amethyst, Sweet Leaf, Col White

Papers : Sweet Harmony ('07)

Stamps : Serendipity, Playful Flourishes, Doodle Alpha, Adorable

Accents : Circle Windows, Edge Anchors, Amethyst brad, Col White waxy flax, ribbon (unknown), stickles, pearl paint, white daisy ink

I made this from an idea that popped into my head while making the last layout. I haven't put it on a card base since I'm still undecided on whether to make it into a card and add a few more embellies or to put it on a layout, size is 4x8. I put some pearl paint on the flowers in the petals and on their tips as well as the amethyst middle. The first pic is with the flash which really makes the paint shine up. The second is more how it looks. Fun to make though a little difficult with the paint at first. I used a very thin layer. I think the paint is more white than clear so if it's too think than the color won't show through. This Serendipity stamp set is just way too cute. I have yet to use the papers though and I'm in baby mode right now (not baby hungry thank goodness!! lol). So I've been trying to do some of Audrey's first year in between playing Wii tennis and watching Heroes along with regular mom duties lol. Doesn't leave much time for creating lately :D. But hopefully Mark will take his stuff back home soon so I won't have so many fun toys to play with lol.

11.16.2007

Let it Snow.... Chocolates!

I finally sat down and made a nugget box. This one holds 12 hershey's nuggets. Templates can be found here : http://www.splitcoaststampers.com/forums/showthread.php?t=190469&highlight=nugget


Colors : Cranberry, Outdoor Denim, Desert Sand

Stamps : Music of Winter, Legendary

Accents : Outdoor Denim Organdy, Pewter square brads (unknown company), round sponge (for distressing)

I made two of these, one for my SIL and one for her hubby for Christmas. They get chocolate and a little surprise :D The ribbon is there more to hold the box closed than for decoration so that it won't slide open in transit since I have to mail them out. I was going to use the Snow Friends stamp set but so many people have been making them with that so I wanted to try something different. Enjoy!

11.11.2007

Tag Ornaments

I'm trying to figure out how to make some cute ornaments with minimal cost for our church. So far this is what I've come up with : 1 sheet of cardstock to create 11 of these.


Closeups of the front and back of the ornament/tag:


Colors : Outdoor denim, Honey, Desert Sand, Cocoa

Stamps : Bethlehem

Accents : Outdoor denim bulk organdy and pop dots to give the star dimention

Recipe : I used my coluzzle tag template to cut 11 tags out from Col White cardstock then used the remainder scraps to stamp out 22 stars (2 stars for each ornament: one on the front, one on the back). The city was stamped first on both sides with cocoa, then the scripts. I sponged outdoor denim for the sky, a layer of honey below that for glow, then the city in desert sand. The stars were cut out and pop dotted for dimention on the tag. I used a small hole punch to make a spot to thread the ribbon through then simply tied a good amount so that it could hang like an ornament. It came out very pretty I think for not having anything but one layer of CS and no b&t.