5.31.2010

Summer Scrap Shopping


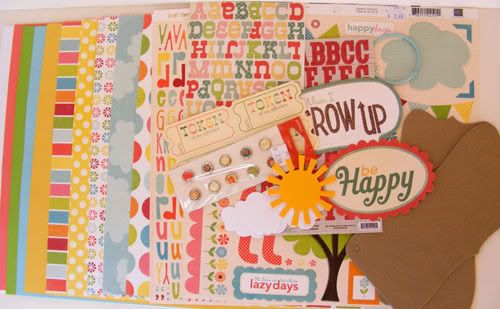
It's been a couple months since I've gotten any scrappin' stuff and with all these new fun summer pictures we've been taking I was inspired to pick up some new goodies. This is what a I got with my $20 at Pebbles ;) Here are the details :


Colored Cardstock by American Crafts
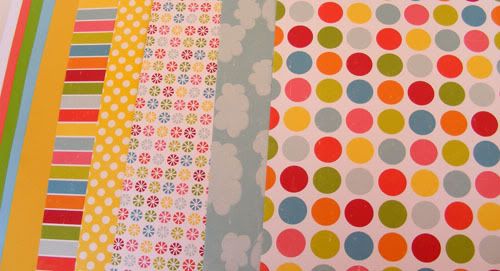
Papers are Sweet Summertime by Crystal Wilkerson from Echo Park Paper Co. - I've never seen that brand before or the designer, but aren't these just too fun!


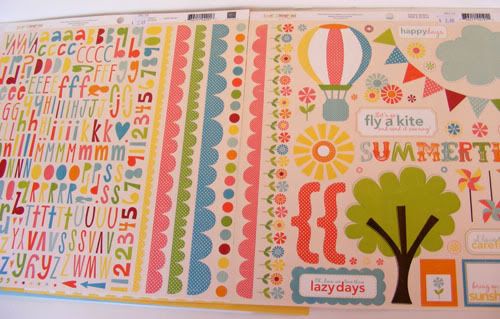
Here are the two sticker sheets, one full of alphas and some darling scallop borders and the other of elements and titles/subtitles both from the Sweet Summertime set. I love the hot air ballon, the big dotted cloud, and the fun bright pendent banner!


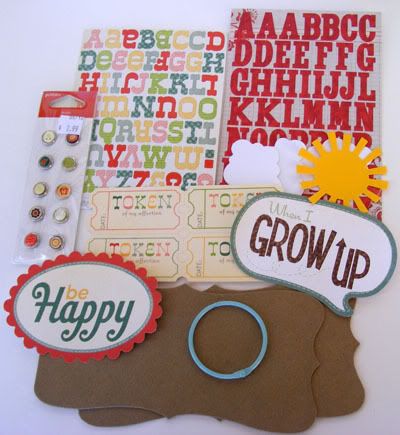
The goodies were mixed and matched, though a lot of them came from My Minds Eye

Quite Contrary Jack & Jill Cute Alphabet by My Minds Eye (multi)
So Sophie Savvy "Best Thing" Alphabet by My Minds Eye (red)
Tree House Epoxy Brads by Pebbles
Quite Contrary Jack & Jill "Be Happy" Title by My Minds Eye
Quite Contrary Jack & Jill "Cute" Tickets by My Minds Eye
Quite Contrary Little Boy Blue "When I Grow Up" Title by My Minds Eye
Cloud and Sun Die Cuts Precut by Pebbles in my Pocket
Chipboard Mini Book Covers Precut by Pebbles in my Pocket
Colored Album Ring by Pebbles in my Pocket

I'll be posting projects made from these real soon! Thanks for popping by ;)

5.29.2010

Lantern Bloom Ottoman


I love the Gum Drop Pillows by Amy Butler and had bought the pattern a little over a month ago. During my blog hiatus I decided it was finally time to put that pattern to work and so I took out more of the Lantern Bloom fabric I had to create a custom ottoman for us! I love how it came out, so pretty!! It was actually much easier to put together than I thought it would be. Usually I'm so intimidated by patterns but this made me feel like breaking out another one and trying my hand and making some more fun goodies! The most frustrating part for me was stitching the top piece on and I think that is only because my sewing machine couldn't handle the layers very well (it's just a cheapy little guy). But even though that part gave me a whole lotta trouble I prevailed and finished it! This baby took 5 32oz packages of stuffing, and it probably could have even taken more, lol. You should have seen me stuffing this sucker, shoving my whole arm in to get the filling even, lol.


I now have to make the smaller one so that the girls leave mine alone, hehe. I guess that means I'll be making two smaller ones ;) I also have plans to make at least one of her zinnia pillows with this line of fabric for our living room and maybe some patchy zinnias for the girls room. We'll see what I get around to making first. I also need to finish a baby quilt I've been making for our new niece. A little over a month ago I mentioned Paul's sister getting near to having her baby. Beth never did get to find out whether she was having a boy or girl through the ultrasound since the baby moved so much, but now that the baby is here we know for sure that she's a girl and can start making and sending baby stuff ;) I started a garden quilt for the crib using some repurposed fabrics from when Cait and Audrey had their room garden themed. It's looking so cute! I just have to decide now to quilt or to tie it and then make and put on the binding. Too many projects, too little time!

5.28.2010

Pumpkin Cream Cupcakes


Speaking of those naughty cupcakes in my last post, here's the recipe along with a no fuss recipe card!

Pumpkin Cream Cupcakes (Kraft Recipes)

1 pkg spice cake mix + oil, water, & eggs per box instructions
1 pkg instant vanilla pudding
1 C canned pumpkin
1 8oz pkg cream cheese, softened
1/4 C sugar
1 egg

Heat oven to 350. Prepare cake batter as directed on the package. Add dry pudding mix and pumpkin; mix well. Spoon into 24 paperlined muffin cups. Beat cream cheese with mixer until creamy. Blend in sugar and egg; spoon over batter. Swirl gently with small spoon. Bake 18-21 min. or until toothpick inserted in center comes out clean. Special extras: mix 1/4 tsp ground nutmeg into 1 1/2 C coolwhip and spread over cooled cupcakes. Keep refrigerated.


Another fun recipe card of our favorite rolls. I'm keeping my cards simple and flat and I haven't decided yet if I'll be putting them into a slip in photo book or in a photo file box. Either way I want them to be flat and easy to handle ;D So far I'll just be working on our favorite recipes. We have quite a few so my goal is to keep it easy and simple, just print one sheet of recipes at a time (3) and make them into cards.


Here is a recipe we haven't used in a while and it is oh so tasty. The girls love "Green Chicken" as they call it ;) I hate how my recipes get lost like this, which is why I'm so excited about this new card thing I'm going to try out. I've had other recipe cards before, but they were usually too small. The large swap I tried was huge 6x6 cards which were cute, but way to big and bulky to be efficient. This is so much quicker and easier. Plus I can use scraps and you all know how much I love that! As we find new favorites I could make the cards and have them all handy together! It makes me want to get the recipe card stamp set from PTI but I'll make do without for now ;)

5.26.2010

Sweet Cupcakes Part 2


And here are the other two cards I made with this set. I played around with a little paper piecing on these two, I love how the cupcake wrappers came out! Now I feel like I have to find some pretty cupcake liners to bake my own in, lol. It's been quite a while since I've made cupcakes (Christmastime) which is a good thing in some ways since the last ones I made were SO naughty. Cream cheese filled Pumpkin Spice Cupcakes, way yummy! They were seriously so good we could not stop eating them until they were gone. Luckily I was able to give away almost half of them so we didn't eat ourselves sick, lol.


This last card was a challenge. I wanted to piece the candle, using the inner yellow of the flower for the flame. A very cute idea, but a very big pain to cut out, lol. I do love the end result so despite the difficulty I may piece the candle yet again on other cards, hehe. So those are the cupcake cards I made. The leftover three will probably be used as birthday cards, we certainly have a lot of those coming up. I hope you enjoyed! Today is Cait's last day of school, yippee for her! Now I need to figure out how to keep her busy ;)


Stamps : Cupcake Collection by PTI
Papers : Sugared by Basic Grey; Cardstock by PTI
Inks : Summer Sunrise and Scarlet Jewel by PTI
Other : Scallop, Circle, and Label Nestabilities; Fiskars Apron Lace Punch; sewing machine w/ white thread

5.24.2010

Sweet Cupcakes Part 1


After I finished those Mother's Day aprons I went to make some cards and realized I have no Mother's Day stamps, lol. I could have done die cut cards, I did have a couple cute ideas on mom cards without stamps, but I was really in the mood to ink up some stuff. And what better to go with aprons than cupcakes! I actually forgot to photo my MIL's card but they are all using the same Basic Grey papers so I'm sure you'll get the idea ;) Here's two of the cards I made. It was so nice to finally use some of these scraps. I still adore this paper even though it's old.


This card is similar to the one I made for my MIL, except hers had two cupcakes to the left with the You make life sweeter sentiment beneath on the right. These two were very fun to make, I actually enjoyed cutting out the cupcakes and finding ways to arrange them on the cards was the best part. I think this would be a fun magnet game for the girls and am thinking of making one with different tops and bottoms for them to play with. Wouldn't that be so cute?!


Stamps : Cupcake Collection by Papertrey Ink
Papers :Sugared by Basic Grey; Cardstock in Sweet Blush, Scarlet Jewel, and Rustic Cream by Papertrey Ink
Inks : Sweet Blush, Summer Sunshine, Scarlet Jewel, and Vintage Cream
Other : Sewing w/white thread, Fiskars Apron Lace Punch

5.21.2010

The Past 3 Weeks


I hope everyone had a Happy Mother's Day and a great Graduation weekend! We've been so busy with family and celebrating, it'll be nice next week when things finally wind down for summer vacation! The first week of May was our week for Teacher Appreciation. I didn't get a chance to get it posted earlier and the pictures aren't great because I took them in a hurry, but here's the card I made for Caitlyn's teacher. Inside Caitlyn drew a picture of her teacher with a rainbow, clouds, and a happy sun inside and wrote a short sweet message. At the bottom I added a message from Paul and I. I was so pleased with how cute it came out! Mrs. F's favorite color is red so that made using red apples all the more fun! This was the first time I used this set for a teacher gift and I can just tell I'm going to be loving using it for teacher projects for years to come!


Here's the card and matching tag on the bag together. I love kraft bags and the really fun part is the quilt shop I frequent puts your purchase in these plain kraft totes so I not only get lovely fabric to play with but also a free gift bag to use later ;) As for us, we had a neurology appointment for Paul a couple weeks before graduation. While his drop-leg has been getting worse and he now wears a knee brace most days to help with that, he did have more sensation in his legs than he did at his appointment back in October which is a good sign. He also had slightly better balance and didn't fall over this time when he had to do some of the closed eye balance tests. Hopefully that means his injections are helping his system retain as much functionality as possible ;) We also got some good news about a new medication that's going through approval right now that's specifically for MS patients to help with walking. It's supposed to help with symptoms like drop-leg so Paul and I are excited for when the FDA approves it and he can try it out.


Mother's Day was fun for me. I got to be lazy and Paul did the dishes, vacuumed, and took care of the girls. Paul got me this gorgeous top, it looks lovely with my olive skin ;) Then we went to see Iron Man 2 and out to dinner. His sister spoiled us by watching the girls for 4 hours, so nice! Paul is finally graduated now with his bachelors, yay! He graduated with Honors in English Literature and hopefully now can take a little time off to write before he takes the GRE and heads back for more school to get his Masters, lol. It's strange to think he's been in school since before Audrey was born. She was born just before midterms his first semester.


This week has been all about Caitlyn. Her class spent Monday and Tuesday getting ready for their program on Wednesday. The theme was 'When I Grow Up' and Cait was a Vet ;) It was SO cute! I can't wait to see more of these as she goes through school. And she was so hilarious, she really gets into the dance moves and has such an expressive face! We loved it especially the Macarena Month song and the First Grade song, she was really swinging her little hips and having a great time up there, lol. Thursday was the Teddy Bear Picnic, where they got to bring lunch and a stuffed animal for a picnic out on the lawn, and today they are doing a Reading Party. Tuesday they get to have a water party and then the next day we meet with the first grade teacher and she's done until fall! I can't believe it's been a whole school year already and that she's going to be in first grade, never mind that my girl is going to be 7! Crazy eh? Anyway, I have done a little crafting the past few weeks, very little but some none the less and I'll be posting those later on ;) I hope you enjoyed and have a fab Friday!

5.02.2010

Aprons for Moms


How about some cute aprons for Mom on Mother's Day! I altered this quick apron tutorial by Make It and Love It to fit the fat quarters I had in my stash to make some aprons for Nana and Granma. While the tutorial apron itself is darling I made binding for the aprons instead of hemming which made my quick aprons not so quick, but since these are for mother's day I think it makes it extra special to have that little detail. I followed the basic tutorial but used a fat quarter for the main piece, the long 22" side going around the waist. Another fat quarter was used to make the waist, ties, and pocket. I used her pocket dimensions of 6x8 but shortened the width of my waist band to 3" instead of 4". It probably would have worked fine with the 4" I would have just needed to piece the extra fabric after I cut the pocket, but since I'm an amateur I thought it best for me to stay safe and simply shorten the band width. A last fat quarter was used to make enough binding for both aprons. On the bottom apron since I had enough of the light blue print I turned that into another pocket and made the ties longer so they can be wrapped around and tied in the front or side like I did here. Anyway, I hope you enjoy my little mom day project and have a lovely Sunday!