11.10.2009

Hoe Down

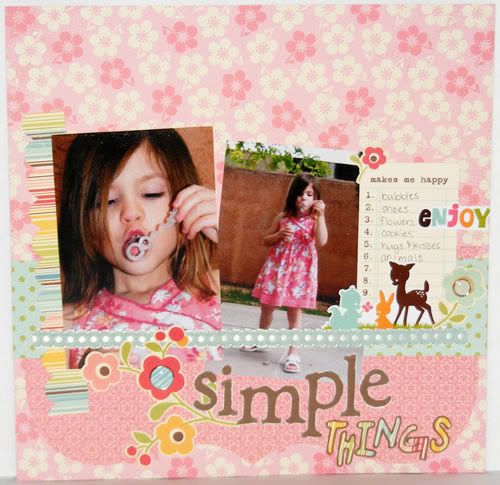
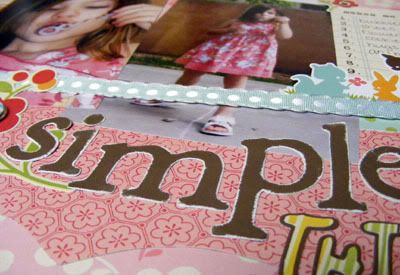
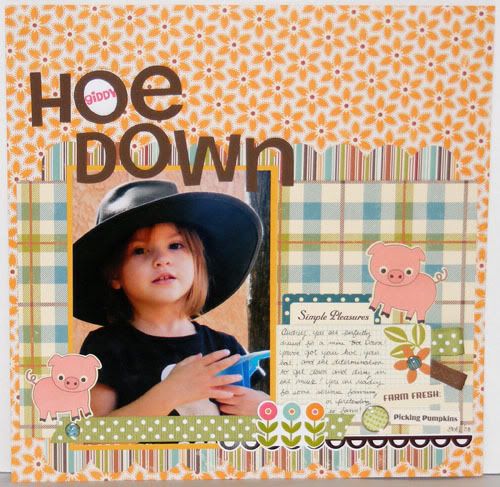
Supplies : Paper - October Afternoon; Journal Prompts, Text Tags, and Pig Stickers by October Afternoon; Remarks and Thickers stickers by American Crafts; Brads from Abbey Road by My Minds Eye; Ribbon from May Arts and CTMH; Cardstock Textured Sunflower from CTMH;

I've been getting sketchy lately since the Triple Challenge that Practical Scrappers was hosting along with Frosted Designs and Stuck on U Sketches. I used another Inspired Blueprints sketch from last month (#31). I flipped it horizontally then I added the journaling spot even though the sketch didn't have one. I just have a hard time not putting journaling on my pages ;) A bunch more October Afternoon papers and using some of that darling new Farm Fresh line, it's just way too cute! This was one of those 'forgotten' photos. I keep all my 5x7s separate from my 4x6 just because the photo box isn't that tall, so I had scrapped all the 4x6s that were supposed to go with this photo. Not that I'm minding at all. These types of mishaps have been forcing me to take my scrapbooking more casually. I don't try to make my albums chronological anymore. Lately I just slip in the pages in whatever order I make them :D I do have some specified albums like the Halloween one I just started and a Christmas album, but all the everyday stuff like this gets put in whatever order I've scrapped them in and it's so liberating to not feel like I have to have them all 'in order'. Anyway, I hope you've all been enjoying these bright cheery layouts! Have a terrific Tuesday!

11.09.2009

Simple Things

Supplies : Paper by October Afternoon; Flower Stickers and Journal Prompt by October Afternoon; Enjoy and Animals Remarks Stickers from American Crafts; Brads Abbey Road by My Minds Eye and Lemonade by Basic Grey; Ribbon by Making Memories; Basics 2 and Handwritten Fonts Slice Cards by Making Memories; Chocolate Cardstock by CTMH

This week the challenge on Practical Scrappers is on using white core cardstock. I used my favorite method on this layout, scissor distressing on my title! I love the soft comfy look it gives to any paper and with white core cardstock the distressing can help make your items gain more presence on the page. For me distressing is the biggest benefit to white core cardstock. Emboss it then sand the embossed image to really make it pop out. You can even sand the paper itself for a more rustic or linen look. Try crumpling your paper up, then laying it out flat and sanding lightly on the creases for great texture. Hold open your scissors and lightly drag it across the edge of your cardstock for easy scissor distressing, lighter for a softer look and harder for a more rugged or torn look. Speaking of tearing, white core cardstock looks great torn, where it can reveal a bold white edge! Score a border around the edge of your base page then sand to create a simple frame. Have fun distressing your titles and shapes cut with your die cut machine or punches, add texture to them by embossing, crumpling, or scoring first! Remember that a little can go a long way so keep it simple; distress a few pumpkins on a page, a title, or the base but don't distress everything so that the elements you want to pop from your distressing/texturing don't get lost on the layout :D I hope you've gotten some fun inspiration on how to use your white core cardstock. Hop on over to Practical Scrappers for more samples and have a marvelous Monday!

11.07.2009

So Lucky

Supplies : Paper - Oh la la by My Minds Eye; Flowers by Prima; Thickers by American Crafts; Cardstock honey by CTMH; Brads Abbey Road by My Minds Eye; Big Kids Card (Slice)

This was a super quick layout to put together probably because it was mostly put together by the time I used it. The To the Rescue page had actually started with these papers because I really wanted to use these on something. But after looking at it for a while I just wasn't feeling it and when I found that rainbow paper I became totally inspired and went from there. Later I thought I had to have some pictures that worked with this layout and colors and I found these ones of Caitlyn. The colors just helped the pictures pop and the mood of the papers matched the mood of Caitlyn's expression in the photos. I used the title So Lucky to go with her shirt and then journaled about how lucky we are to have her. I think a great challenge for this month would be to create thankful layouts about people and things in our lives that we're grateful for. Thanks for popping on by and have a splendid weekend!

11.06.2009

More Forest Friends

Supplies: Rustic White and Kraft Cardstock, Green Tea Leaves and In Bloom Paper, Forest Friends, Forest Friends Sentiments, and Vintage Labels, Buttons and Jute by Papertrey Ink; Sweet Leaf Cardstock, Sweet Leaf, Cocoa, and Sorbet Ink by CTMH; Apron Lace Punch by Fiskars

I created a couple more cards with the Forest Friends and this same color scheme. My favorite image in this set is the skunk. I haven't a clue why, I just like him a lot. I made another pattern using the Vintage Labels set, the cocoa on sweet leaf up at the top. I followed Dawn McVey's samples to create a lot of the backgrounds I stamped using this set. She really has an eye for making background papers and I love how easy they are to replicate! The little skunk is pop dotted up and I finally broke into my pretty In Bloom paper. I think it's so cute how he's in a little patch of flowers with that sentiment.


This other card was a lot of fun to make. Using another stamp from the Vintage Labels, I stamped out the background using cocoa ink on kraft. This was my favorite background out of the cards I made. I pop dotted the hedgehog like the skunk in the first card and finished off with more buttons. For the longest time I actually thought the hedgehog was a porcupine. I had been calling it a porcupine all this time until this last month when I was looking up ideas for this stamp set. Then I read he was a hedgehog. I had to look at the stamp again and then realized, oh yeah, he is! Anyway, enjoy the cards and thanks for visiting!

11.05.2009

Forest Friends and Vintage Labels


Supplies: Rustic White and Kraft Cardstock, Green Tea Leaves and In Bloom Paper, Forest Friends, Forest Friends Sentiments, and Vintage Labels, Buttons and Jute by Papertrey Ink; Sweet Leaf Cardstock, Sweet Leaf, Cocoa, and Sorbet Ink by CTMH; Apron Lace Punch by Fiskars

Sometimes I buy a stamp set I love and never really get around to playing with it. Forest Friends is a set I got almost a year ago and I think I've inked it up maybe twice. So I took it out seeing as it's getting to be fall and that always reminds me of wildlife and I set to work on making some fun cards. The Deer was the first card I made. I love these colors together, so earthy! The deer mat is up on pop dots for more dimension and I finally used one of those fabulous big PTI buttons. I have been eyeing them in this color set, I have just a couple more and I love that pearly shine they have! The pretty flourish background is a stamp in the Vintage Labels set which I am loving more and more each time I use it! This card went out to Sparkle and she got it a couple weeks ago ^_~ I'm just slow in posting!


This second card is a fun one that is going to my hubby with a jar of cashews (his favs) just for fun. I used the nuts from My Punny Valentine, I love that the PTI sets are so intermixable. Now I just need to decorate the jar. I always have so much fun doing altered projects but I rarely ever create them because getting started is the hardest part for me and I get intimidated by the extra steps. Which is funny because usually altering or decorating a little gift item is far faster than putting together a page. Maybe it's just the fact that it's 3D. Either way, I sit and look at my project for what seems like forever before I reach that get-go point and just create! I do with this quilts too, except it's even longer than with paper crafts!! Maybe that's why I haven't quilted in so long :D Enjoy the cards and have a terrific Thursday!

11.04.2009

To the Rescue

Supplies : Paper by Sassafras, My Minds Eye; Brads by Basic Grey; White Remarks letter stickers by American Crafts; Big Kid and Basic 1 Slice Cards;

Here is a completely non-traditional page, with not a bit of Halloweeny stuff in sight! I wanted to play with the blue, red, and gold that Caitlyn's costume is and I was drawn to this rainbow paper by Sassafrass so I pulled all the other papers and colors to coordinate with that pattern. The green background is also by Sassafras and looks a bit like linen which gives the layout some fun texture. With my Slice I cut the title using the font from Big Kids in some varied sizes and then cut some of the open stars from the Basics 1 card. Though neither of the girls were Cinderella last year, they both wore the dress quite a bit when the other was in their superhero outfit. It was so funny how whoever was the superhero had to 'rescue' Cinderella from nothing really in particular. Caitlyn would shout right away "Supergirl to the Rescue!" and after a while Audrey followed suit yelling "To the Rescue!" anytime she wore her batgirl costume. I hope you enjoy the layout! Thanks for visiting and have a super Wednesday!

11.03.2009

Hero Fashion

Supplies : Paper Eerie by Basic Grey, journaling paper by Creative Imaginations; Thickers and Remarks letter stickers by American Crafts; Black and White Cardstock; 1 3/4 Circle punch by EK Success; Apron Lace Border Punch by Fiskars

This layout ended up nothing like it started out to be in my head. First off it was horizontally striped before with only the two top photos. After lots of playing around I fell in love with the vertical placement. The circles were going to be small journaling prompts in a row on the right side which changed when I suddenly thought of doing the belt, boots, and bat mini journal spots. After that the rest of the layout was simple. There aren't any embellishements on this page as I wanted to keep the text the focal. I love the note next to Boots : for kickin' crime in the behind! Belt : to hold all those important gadgets.... and snacks. Bat : the perfect accessory is your favorite animal! Which is true for Audrey during Halloween. She loves Squeaky, their stuffed bat, and the book Stellaluna. Of course they are two completely different bats (vampire and fruit) but she doesn't care. A bat is a bat and bats are awesome :) My ultimate favorite about this layout has got to be that crazy pose she's doing in the bottom picture! She was trying to be strong, she said. So silly! I know it's after Halloween but I still have a few layouts left to post and sadly even after all these layouts I've only scrapped about half the pictures from last year, yikes! In my defense most of the pictures were not taken on Halloween but throughout October :D This year I'm proud to say I did much better. Anyway, enjoy the page and have a great day!

11.02.2009

4 a Moment

Supplies : Paper by October Afternoon; Journaling Prompt and Text Elements by October Afternoon; Owl, Cloud, Daydream sticker and Thickers Stickers by American Crafts; Ribbons by Pebbles Inc, CTMH, and Making Memories; Brads by My Minds Eyes Abbey Road; Apron Lace Punch by Fiskars; Sketch by Pagemaps

Practical Scrappers is teamed up with Frosted Designs and Stuck On U Sketches for a Triple Challenge complete with prizes from each challenge site this week! You can incorporate all the challenges like I did here on this layout, or you can make two or three seperate projects. The only catch is to qualify for the prizes, you need to do all three challenges. The Practical Scrappers Challenge for this week is to use up your ribbons! I'm almost as bad with ribbon as I am with paper. It's so easy to buy one yard here and there, then end up with a huge stash! Ribbon tabs are one of the easiest ways to add different patterns/colors of ribbon to your page without overwhelming it. It's also a great technique for using up those tiny ribbon scraps as well! I used some various sizes to give my ribbon more interest. Try cutting them at different angles or letting them fray for interest instead of making tabs. Use wider ribbon strips in place of pattern paper for texture or create flowers, leaves, sunrays, etc. The Frosted Designs Challenge was to use an owl someplace on your project and the Stuck On U Sketches challenge was of course to use a sketch :) I picked this cute owl from a set of American Crafts Stickers and rotated + flipped the sketch to fit my photo. Don't forget to stop by Practical Scrappers for the challenge and more inspiration on how to use up your ribbon and maybe even a few more samples using the triple challenge! Thanks for visiting and have a wonderful Monday!